Basil Pesto from the Garden

Many years ago, thinking I needed a night out, my sister Christine took me to a quilt shop Open House.  I did. But while the memory of the event has faded, the dish she made — Pasta with Pesto (see notes below) — is still vivid in my mind.  While I haven’t made the pasta recipe too much, every year when the basil plants in the garden threaten to take over the entire plot, I snip the branches and make some pesto to put in the freezer.

Choose wrinkly leaves from your plant, as shown in the top photo.  When the plants start to set blooms, the leaves change becoming stiff and pointy, which is why my husband and I are always out in the garden pulling off the flowers.

3-4 cups of basil leaves, washed and laid out to dry on a paper towel (blot excess moisture)
3/4 to 1 cup olive oil
3 Tablespoons toasted pinenuts
3 large cloves of garlic (or if you want to add this later, chop your garlic)
1/2 to 3/4 cup grated Parmesan cheese

Place garlic in a blender, and put in basil leaves on top.  Add pinenuts and cheese.

With blender going, drizzle in the olive oil, until desired consistency.

Place pesto into jars; place in refrigerator for current use.  Freeze for long-term storage; I chip out chunks to put into soups, sauces, or wherever I need that fresh-from-the-garden taste.


**To make that Pasta with Pesto, mentioned in the beginning, pour the pesto over hot cooked pasta, with a glug of olive oil.

Serve hot or at room temperatures.  Can add slightly sauteed vegetables of your choice (zucchini, carrots, red sweet peppers, etc.) and/or cooked, diced chicken meat.

Low Sugar Strawberry Jam

Laurel brought me a jar of her Low Sugar Strawberry Jam, which prompted me to ask for the recipe, which then entailed a drive out to the neighboring town to get the very best strawberries, then a trip to the grocery store for the special Low Sugar Pectin.
It was worth it.

Low Sugar Strawberry Jam

Wash jars in hot soapy water, and turn upside down onto a rimmed cookie sheet.  Place in warm oven.  Place NEW lids and rings in hot water while you prepare the jam.

Prepare:
6 cups of strawberries – washed, hulled, and smashed
1 cup apple juice
3 Tbls  Ball Real Fruit Low or No Sugar Pectin (Don’t use regular pectin. Low or No Sugar Pectin really is necessary.)
2 cups sugar

Place prepared berries, apple juice, pectin, and sugar in a large pot and stir while you bring mixture to a rolling boil. Boil for 4 minutes, stirring constantly.  Use an immersion blender to thoroughly blend the strawberries.

Pour hot jam into jars, leaving about ½  inch of space at the top. Wipe rim clean. Place lid on rim and tighten with ring. Set out on counter until completely cool. You should hear the jars seal, but if you have any doubt, refrigerate or freeze the jars.

Note: It has a different consistency than regular jam, but the slightly-less sweet spread is delicious.

Brussels Sprouts with Hazelnuts

1 ½ – 2 pounds brussels sprouts
¼ cup olive oil
¾ teaspoon sea salt
¼ teaspoon (or 10 grinds) black pepper
2 tablespoons maple syrup
½ cup toasted hazelnuts, coarsely chopped

Preparation
Preheat the oven to 375 degrees.
To prepare the brussels sprouts, remove any yellow or brown outer leaves, cut off the stems and cut in half.
In a large bowl, toss the brussels sprouts, olive oil, salt and pepper together. Once all of the brussels sprouts are coated in oil, spread them into a 9-by-13-inch (or larger) baking dish or sheet tray to roast. Note: You may want to line your sheet tray with foil for easy cleanup because the caramelizing process leaves a sticky residue.
After 15 minutes, stir the brussels sprouts with a spatula or large spoon to even out the browning. After 30 minutes, stir in the maple syrup. Continue to roast the brussels sprouts for about 15 more minutes, or until they are fork tender (about 45 minutes total roasting time).  Toss the roasted brussels sprouts with the hazelnuts and devour!

NOTE: If your sprouts are on the smallish side, they may need less time overall.  Cook only until fork tender.

To toast hazelnuts, place in pan over low heat, tossing or stirring frequently so they don’t burn.  They should let off a fragrance when they are toasted, in probably no more than 5 minutes total time.

Cheezy (Funeral) Potatoes, my version

Everybody has this recipe and has made it for millenia, but I made my first batch of these this year, and wanted to put the recipe on this blog for future reference.  I joke that instead of crushed cornflakes on top, we should put crushed statins, but then maybe you have to be of a certain age to get the reference.  Let’s just say, I’ll try not to make these unless I’m going to share them.

Preheat oven to 350 degrees.

Saute ¾ cup diced onion in 3 Tablespoons of real butter, until the onion is transluscent.
Add 2 cloves garlic, minced, and then cook for another minute or two, but don’t let the vegetables brown.

In a large bowl, place:
1 (30 ounce) bag of frozen, shredded has brown potatoes — if frozen (mine were), poke at it with a sturdy spoon to break it up a little
1 (10.5 ounce) can condensed cream of chicken soup–fish out the big pieces of chicken meat
1 cup LITE sour cream
1 teaspoon salt
½ teaspoon ground pepper
1-1/2 cups cheddar cheese, shredded

Add onion mixture to the above and stir well until mixed.  Keep stirring, keep stirring.

Melt 3 Tablespoons real butter, and add to 1½ cup crushed cornflake crumbs, about one-half of a small box.  Stir to mix.

Place potato mixture into a 9 x 13″ pan, pressing firmly into place.  Sprinkle 1/2 cup cheddar cheese over the surface, then spread the conflake crumbs over the top of that.

Bake for 90 minutes or until cooked throughout and bubbly.

Here’s a couple of photos of what was going on:

Mixing up the potato ingredients

Layers of topping: cheese, then cornflakes

Quince with Cipollini Onions and Bacon

quince recipe

Another New York Times recipe, this is also interesting and delicious.  It all started when I had a quince and apple pie at our quilter’s night (thank you, Simone) and then the New York Times did a fabulous feature on all these recipes from all over the United States, where I found this one.  I think it’s a stellar side dish for Thanksgiving.  Because there are two of us, I halved it, so that’s what you see in the photos.

quince quince recipe1 quince recipe2

Ingredients
1 pound cipollini onions
***Note: If you can’t find the cipollini onions, substitute golden pearl onions.***
2 ½ to 3 pounds quinces (about 5), peeled, cored and cut into 1-inch chunks
6 tablespoons pure syrup [Grade A, medium amber]
½ pound thick-cut bacon
4 tablespoons good quality balsamic vinegar
¾ teaspoon ground nutmeg
Salt and ground black pepper
1 tablespoon chopped flat-leaf parsley leaves
Leaves from 5 sprigs fresh thyme

Preparation

cipolini  Bring 2 quarts water to a boil, add the onions, turn off the heat and let sit 5   minutes. Drain and allow to cool.  {NOTE: The packaging from the onions said to cut off one end, and then kind of “squirt” out the inner onion out of its skin.  I did this.}

Heat oven to 425 degrees. Toss quinces with half the maple syrup and spread in a single layer in a large baking pan. Bake 25 minutes, until tender.

Peel and trim the onions. Quarter large ones; cut small ones in half. Fry bacon in a large sauté pan over medium heat until browned. Remove and drain on paper towels. Pour off all but 2 tablespoons of the bacon fat. Add onions to the pan and sauté on medium until lightly browned, about 6 minutes.

Cut bacon strips in 3/4-inch pieces. Add to pan with onions. Reduce heat to low. Add remaining maple syrup and the vinegar. Fold in quince. Add nutmeg and season with salt and pepper. Add parsley and thyme. Gently fold ingredients together. Cook a few minutes, then serve warm.

Cranberry Sauce with Grape Juice, Vanilla and Spices

cranberry sauceI wanted to try a new version of cranberry sauce this year, and found this one on the New York Times website.  Since I don’t drink alcohol, I tried it with grape juice and it was still really delicious.  See Cook’s Notes at end regarding the amount of sweeteners.

Time needed: 20 minutes, plus cooling  Yield: 2 1/2 cups

10 whole allspice berries (I took that to mean “whole allspice”; see note below)
10 whole cloves
10 whole black peppercorns
Combine allspice, cloves and peppercorns in a spice grinder or coffee grinder and pulse until finely ground.

———-Or, just use powdered spices, substituting 1/2 tsp. of each for the whole spices——

3 cups fresh or thawed frozen cranberries
1 cup Welch’s purple grape juice
3/4 to  1 cup light brown sugar**
3/4 to 1 cup clover or wildflower honey**
3/4 cup fresh orange juice
4 strips orange zest, about 1 inch by 3 inches, removed with a vegetable peeler
1 (6-inch) sprigs rosemary
1 small cinnamon stick
1 vanilla pod

Preparation
In a medium saucepan, combine cranberries, grape juice, brown sugar, honey, orange juice, orange zest, rosemary, cinnamon stick and ground spices.  With the tip of a paring knife, split vanilla pod lengthwise. Use the back of the knife to scrape seeds from pod. Add seeds and pod to pot.

Bring mixture to a boil, then reduce heat to a gentle simmer. Cook, stirring often, until cranberries have burst and liquid thickens slightly, about 15 minutes. Remove from heat and discard zest, rosemary sprig, cinnamon stick and vanilla pod. Transfer mixture to a bowl and let cool.

**Important: TASTE the sauce.  Start with the lesser amount of sugar and honey and add as needed.  Early in the season my oranges are more tart so I need to use the full complement of sweeteners.  Later, when the oranges are more sweet, I can use the lesser amount of honey and/or brown sugar.  This sauce should be tart, balanced by sweet.

Updated November 2016

Hummus

HummusI whipped up a batch of hummus a while ago, based on this excellent recipe from the blog Inspired Taste.  While I list the ingredients here, head over there to see their video and their tips.  My sister-in-law Julie tipped me off to this–and they are right.  It is easy to make and really good.

Ingredients
one 15-ounce can (425 grams) chickpeas, also called garbanzo beans
1/4 cup (59 ml) fresh lemon juice, about 1 large lemon
1/4 cup (59 ml) tahini (I use their Homemade Tahini recipe, see below)
half of a large garlic clove, minced
2 tablespoons olive oil, plus more for serving
1/2 to 1 teaspoon kosher salt, depending on taste
1/2 teaspoon ground cumin
2 to 3 tablespoons water
dash of ground paprika for serving

Directions
In the bowl of a food processor, combine tahini and lemon juice. Process for 1 minute. Scrape sides and bottom of bowl then turn on and process for 30 seconds, as it whips up the tahini, making a smooth and creamy hummus possible.

Add olive oil, minced garlic, cumin and the salt to the whipped tahini and lemon juice mixture. Process for 30 seconds, scrape sides and bottom of bowl then process another 30 seconds.

Open can of chickpeas, drain liquid then rinse well with water. Add half of the chickpeas* to the food processor then process for 1 minute. Scrape sides and bottom of bowl, add remaining chickpeas and process for 1 to 2 minutes or until thick and quite smooth.

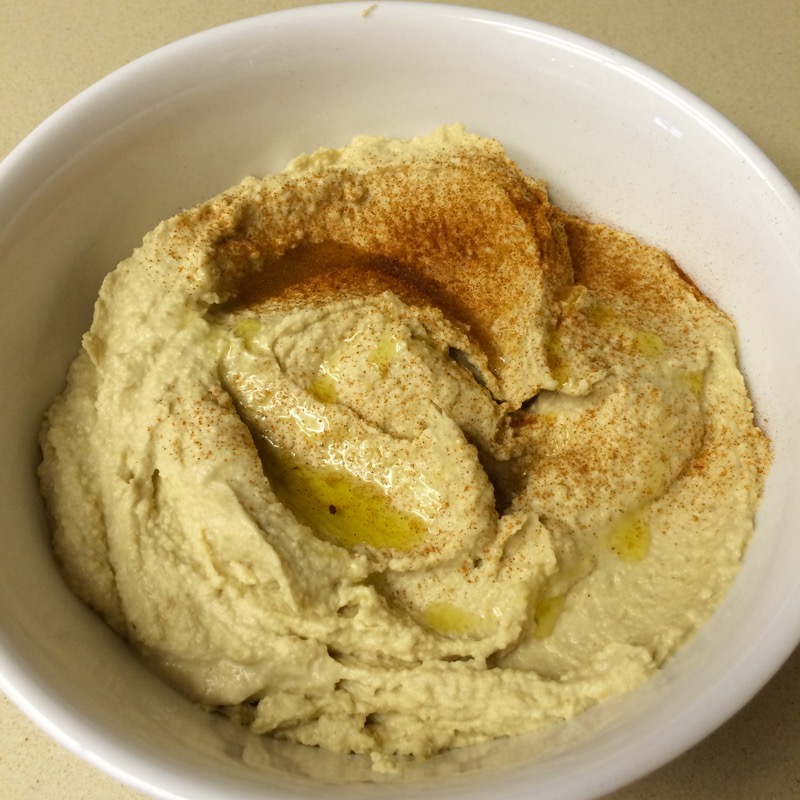
Most likely the hummus will be too thick or still have tiny bits of chickpea. To fix this, with the food processor turned on, slowly add 2 to 3 tablespoons of water until the consistency is perfect. Scrape the hummus into a bowl then drizzle about 1 tablespoon of olive oil over the top and sprinkle with paprika.

Store homemade hummus in an airtight container and refrigerate up to one week.

*On their website they did a comparison of hummus between slipping off all the chickpea skins, and not slipping them off before processing. After I saw the photos, I decided that I’d leave the skins on as it didn’t seem to make that much of a difference.

Charlie and HummusHere’s our grandson Charlie enjoying a bit of hummus on his pita bread.

˚˚˚˚˚˚˚˚˚˚˚˚˚˚˚˚˚˚˚˚˚˚˚˚˚˚˚˚˚˚˚˚˚˚˚˚˚˚˚˚˚˚

Tahini Paste (from Inspired Taste)

Ingredients
1 cup (5 ounces or 140 grams) sesame seeds, we prefer hulled
3 to 4 tablespoons neutral flavored oil such as grape seed, canola or a light olive oil
Pinch of salt

Directions
Add sesame seeds to a wide, dry saucepan over medium-low heat and toast, stirring constantly until the seeds become fragrant and very lightly colored (not brown), 3 to 5 minutes. Transfer toasted seeds to a baking sheet or large plate and cool completely. (Careful here, sesame seeds can burn quickly).
Add sesame seeds to the bowl of a food processor then process until a crumbly paste forms, about 1 minute. Add 3 tablespoons of the oil then process for 2 to 3 minutes more, stopping to scrape the bottom and sides of the food processor a couple times. Check the tahini’s consistency. It should be smooth, not gritty and should be pourable. You may need to process for another minute or add the additional tablespoon of oil.
Taste the tahini for seasoning then add salt to taste. Process 5 to 10 seconds to mix it in.
Store tahini covered in the refrigerator for one month. You may notice it separates over time, like a natural peanut butter would. If this happens, give the tahini a good stir before using.

Cranberry Sauce Duo

We went back and forth this year on whether or not to go out to a restaurant or stay home and cook.  Out?  In?  And since all our children were taken care of and I heard it was going to rain, In was what won in the end.  I went looking for my mother’s most recent cranberry sauce recipe–tore apart all my stashes of clipped, stained, printed-out papers but couldn’t find it.  I went to Epicurious and searched.  Then I realized I probably had it on my computer.  Duh.

So here are two cranberry sauce recipes.  The first is from Epicurious, dated 2000. It’s a bit tart, but with the addition of ginger and the pepper, has a good tang to it. The second came from my mother and I don’t know where she got it from.

Cranberry Relish, from Epicurious

2 oranges
1 cup sugar
2 teaspoons lemon juice
2 teaspoons fresh ginger, cut in fine julienne
1 bag (12 ounces) fresh or frozen cranberries
1/2 teaspoon freshly ground white pepper

Preparation
1. Peel 1 orange and cut the zest (orange part only) into a very fine julienne, as thin as possible; set aside. Squeeze both oranges for juice; set aside.

2. Combine sugar and lemon juice in a small sauté pan. Heat up slowly and continue cooking until the sugar begins to caramelize. If necessary, wash down the sides of the pan by brushing with a little water to keep the sugar from burning.

3. When the sugar is caramel colored, add the julienned ginger and orange zest. Cook for about 1 minute, then add the cranberries, orange juice and pepper. Continue to cook on medium-high heat, stirring frequently, for about 5 minutes or until the cranberries are slightly broken but not mushy (frozen cranberries will take about 7 minutes). Remove from the heat and let cool.

Cook’s Notes: I like my berry sauce a little soft, so I cooked it a little longer than they said.  I also tasted it and added about 2 Tablespoons sugar as it was a bit mouth-puckery too tart for me.  I think my oranges were smaller so everything was more intense.  I also grated my fresh ginger, as I keep it in the freezer and there was no way it could have been julienned.

Mom’s Cranberry Sauce, 2006

Cook 12 oz bag fresh cranberries in 1 cup water until skins pop open.  Add 2 cups sugar, scant cup chopped golden raisens, 1 chopped Granny Smith apple, zest and juice of 1 lemon, zest and juice of 1 orange.  Cook 15 minutes or until slightly thickened.  Add 1/2 cup chopped walnuts.

(The best yet, she says.)

Korean Tacos

This post is for Lynne, my fabulous mail lady, who takes a personal and friendly interest in all of us on the mail route.  She and her sister are getting together on Fourth of July with their families and she wanted to grill something, rather than order in a pizza.  Couple that impetus with my visit some time ago to the LA County Museum of Art (LACMA) where parked out front along the street, were all kinds of food trucks.

I was delighted because I’d heard about this phenomena, but since I am from a neighboring city we would probably never have such a gourmet delight.  We tried the Korean Tacos–a hybrid of Asian-flavors wrapped up in a tortilla.  Not cheap, so we shared one, and besides we were saving our hunger for Chinese Dumplings.  But I searched for a recipe, finding one that had been printed in the now-defunct Gourmet Magazine.

For meat, I had some really thick boneless pork chops (1″ thick) in the freezer.  I let them partially thaw which allowed me to get a really thin slice on the meat.  I used two pork chops,  which served two amply with leftovers for another meal.  Guessing? They probably weighed together about 3/4 pound.  Place them in a zip-lock bag, then add the marinade:

2 tablespoons soy sauce
1/4 cup sugar
1 tablespoon minced garlic
2 teaspoons Asian sesame oil (available at grocery stores–get a smaller bottle if you don’t plan to use it a lot, and store it in your fridge)
1 Tablespoon rice vinegar
1 Tablespoon water
1/4 teaspoon dried hot pepper flakes (the kind you get to put on your pizza)

Marinate at least 2 hours or up to 24 hours.  I did this in the morning, then pulled it out of the refrigerator about an hour before grilling.

On a fairly hot (but not scorching) grill, lay out the slices of pork a few at a time, then go back and flip them over.  They will cook REALLY quickly since they are so thin.

Warm some tortillas, either by wrapping in foil and placing at the back of the grill over indirect heat, or by warming them in a frying pan.  We use the thicker white corn tortillas, which don’t fall apart and are more like the Korean tacos we tried. I think we bought these at Von’s in the plaza, but I’ve seen them other places, too.  Place the pork in the tortilla, layer some slaw on top, and if you like a little more heat, pass some siroche red pepper sauce for the top.

Napa-Romaine Slaw

Makes about 6 cups, enough for many tacos, with leftovers

For the dressing:
1 tablespoon soy sauce
1-1/2 teaspoons lime juice
1-1/2 teaspoons toasted sesame oil
1/4 teaspoon sugar

For the salad:
4 cups (5 ounces) shredded romaine lettuce
2 cups (3 ounces) shredded Napa cabbage
1/2 cup (2 ounces) thinly sliced onion
toasted sesame seeds for garnish

Toss the salad in a large bowl with 1 tablespoon of the dressing. Add more dressing to taste and garnish generously with sesame seeds.

We served our tacos with some rice, into which I’d added some sliced green onions, about a teaspoon of sesame oil, and a dash of soy sauce.  You could just make extra of the slaw dressing and toss with that.

Quinoa, Corn and Edamame Salad

I first read this recipe in the New York Times, in a special article on summer salads with recipes by Martha Rose Shulman.  I subjected Dave, my husband, to a series of these, and he declared this one to be a winner.  It’s pretty–green and red–and crunchy, but not a wildly out of control crunch–just pleasant fresh vegetable munching.  While this is a summer salad, I could also see it served as cold side dish at a holiday buffet, as the colors are so beautiful. Regarding the “optional” feta cheese: we tried it both ways–with and without.  Adding the feta cheese brings a creaminess, a certain “mouth” satisfaction to the dish.  I recommend it.

For the salad:
1 cup quinoa, cooked (I made it with chicken broth, but water works as well.  Click **here** for basic quinoa cooking directions.)
1/2  of a 16-ounce bag of WHITE frozen corn
1 small red onion (about 1/3 cup), cut in small dice
1 red bell pepper, cut in small dice
1/2 cup thinly sliced celery, from the tender inner stalks
4 or 5 radishes, sliced
1/2 cup fresh or thawed frozen edamame
2 ounces mild feta, cut in small dice (about 1/2 cup), or crumbled.  I buy the bricks, then crumble it.
1/2  jalapeño chile, seeds and membranes removed, minced finely
1/3 cup chopped cilantro

For the dressing:
2 tablespoons fresh lime juice (about 1 small lime, depending on size)
1 garlic clove, finely minced or pureed
1/4 cup extra virgin olive oil
Salt to taste

Soak the onion in cold water to cover for five minutes. Drain, rinse and drain on paper towels.  **I have no idea why this step is here, but I did it.  Must be some kitchen chemistry.

Combine all the salad ingredients in a large bowl. Whisk together the dressing ingredients and toss with the salad. Serve.

Yield: Serves four main dish, and six side dish servings.

Advance preparation: The quinoa freezes well and the assembled salad will keep for a day in the refrigerator.

Here’s our version. I served it with a delicious foccacia from the local bakery, which was topped with tomatoes, potatoes and dill.  We were full after our meal, and our leftovers the next day were even better.

Nutritional information per serving (four servings): 359 calories; 18 grams fat; 2 grams saturated fat; 0 milligrams cholesterol; 43 grams carbohydrates; 6 grams dietary fiber; 25 milligrams sodium (does not include salt added during cooking); 10 grams protein