Revised: Tiny Vanilla Cake

Perfect for two!

Revised Small Vanilla Cake
(I already published the original, but we’ve made so many changes, I thought I would post them here.)

Preheat oven to 350F.  Butter/grease the bottom and sides of your 6″ springform pan.  Cut out a parchment circle for the bottom, place in in the pan, then butter it again.  Dust lightly with flour, tapping out excess.

Ingredients

1 stick (8 Tablespoons) real butter, at room temperature
3/4 cup granulated sugar
1 1/2 cups all-purpose flour, divided
1 teaspoon baking powder
1/4 teaspoon baking soda
1/4 teaspoon salt
2 Tablespoons pure vanilla extract
2 eggs, at room temperature
1/2 cup buttermilk

Glaze Ingredients:
1/2 cup powdered sugar, plus more if needed
3 Tbls fresh lemon juice

Make:
Stir together the 1/2 cup flour, baking powder, baking soda, and salt; set aside.

Place the butter in the bowl of a stand mixer, fitted with a paddle beater.  Beat the butter on medium speed for 30 seconds, then gradually add the sugar.  Continue beating on medium speed for another 4 minutes, scraping the bowl at the halfway point, until it is light in color and fluffy.

Add vanilla extract and beat until combined.  With the mixer on, gradually add the eggs, one at a time, making sure they are well blended into the mixture.  Williams notes: “if the batter curdles, add 1 to 2 Tablespoons of the flour mixture to bind it back together.”  (I had that problem only once.)

Alternate adding dry ingredients with the milk: first add the reserved dry ingredients to the butter mixture, then the 1/4 cup buttermilk (approx).  Add another 1/2 cup flour, then the remainder of the buttermilk.  End by adding the rest of the flour, but don’t overbeat.  Scrape down sides and bottom of the bowl, blending well.

Pour the batter into the prepared pan and smooth the top.  Bake in the center of the oven for 55 minutes, checking after 50.  If you like a lighter colored cake, cover with tin foil after 30 minutes.  Check for doneness when a wooden toothpick inserted into the center comes out clean, and it bounces back after lightly tapping it.

Let stand for 10 minutes on a cooling rack.  Release the springform pan ring (run a knife around the inside of the pan, if needed) and remove.  Turn cake over, and remove both the pan bottom and the parchment, then return it to the cooling rack, right-side up.

Add the lemon juice to the powdered sugar, and whisk together, getting rid of any lumps.  The glaze should be on the thick side.  If needed add more powdered sugar, 1/4 cup at a time, whisking well after each addition.

Glaze now, while it is still warm, pouring the glaze on the top, and letting it slowly drip down the sides. It helps to put a sheet of waxed paper underneath the rack and the cake to catch any drips.

Buttermilk Waffles

The original source of this recipe was Joy of Cooking cookbook, given to me for a belated wedding gift in 1975. I probably made these waffles every week of my life when my children were growing up.

Buttermilk Waffles

Mix together:
2 cups flour
1/4 teaspoon soda
1 1/3 teaspoons double-acting baking powder
1 Tablespoon sugar
1/2 teaspoon salt.

In a separate bowl, beat until light:
2 egg yolks
Add and beat
1 3/4 cups buttermilk
6 Tablespoons melted butter

Combine the liquid and the dry ingredients with a few swift strokes (by hand).

In a separate bowl, beat until stiff, but not dry:
2 egg whites
Fold them into the batter.

Pour batter in a preheated waffle iron, covering the surface about 2/3 full. Bake for about 4 minutes, or until the steam has stopped emerging from the crack of the iron. If you try to lift the top of the iron and the top shows resistance, it probably means the waffle is not quite done. Wait another minute and try again. (Sometimes a fork can be useful to help loosen that top iron from the waffle.)

I like to sprinkle chopped walnuts on top of the waffle before closing the iron. Serve with warmed REAL maple syrup.

NOTE: The cookbook says “You may think our waffle recipes heavy in fat. But the richer the waffle dough, the crisper it becomes. With the butter flavor baked in, there is no reason to ladle butter on top….Since waffles are made from a batter, keep them tender by not overbeating or overmixing the dough.”

If you find that your waffle continually sticks, brush a small amount of shortening on the grids. A well-seasoned waffle iron doesn’t usually require more grease or oil.

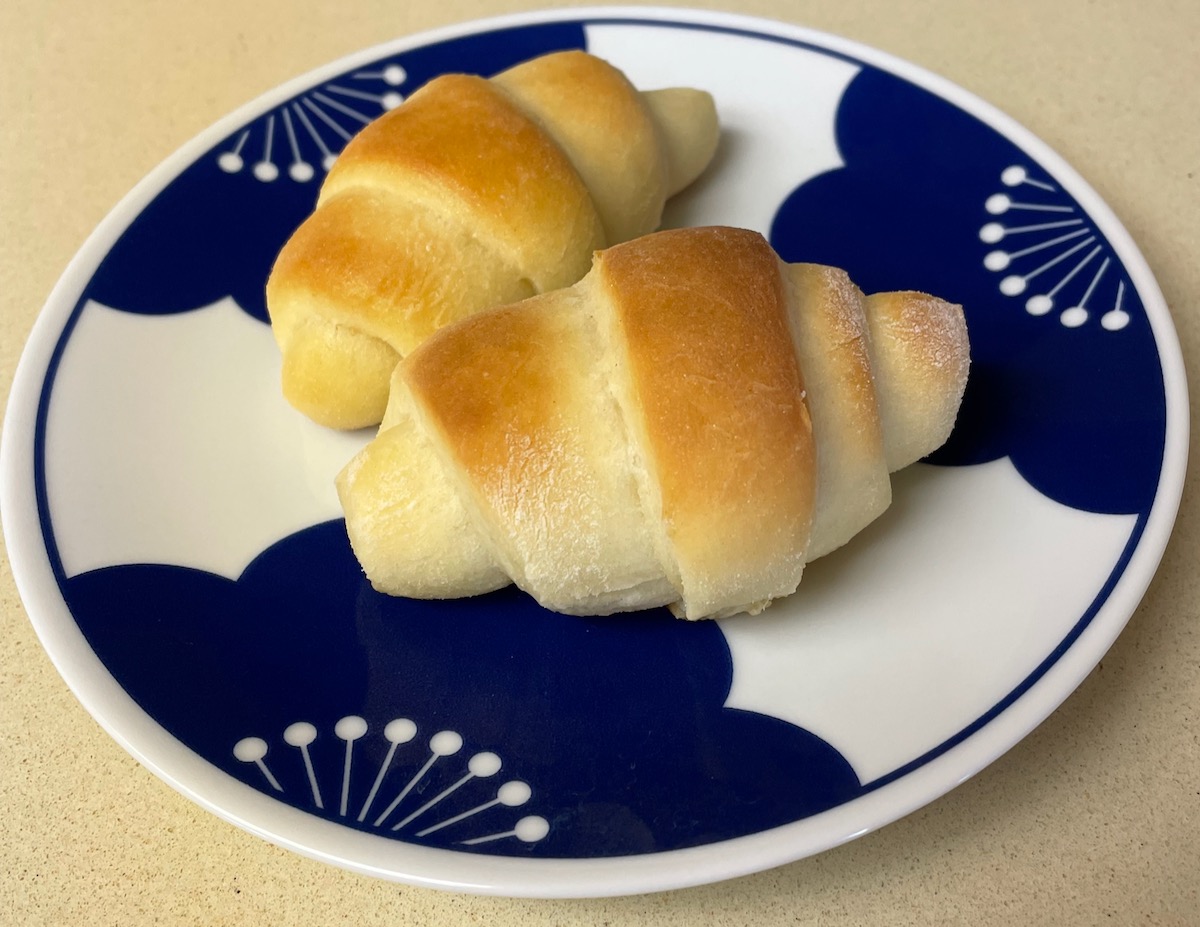
Mom’s Dinner Rolls

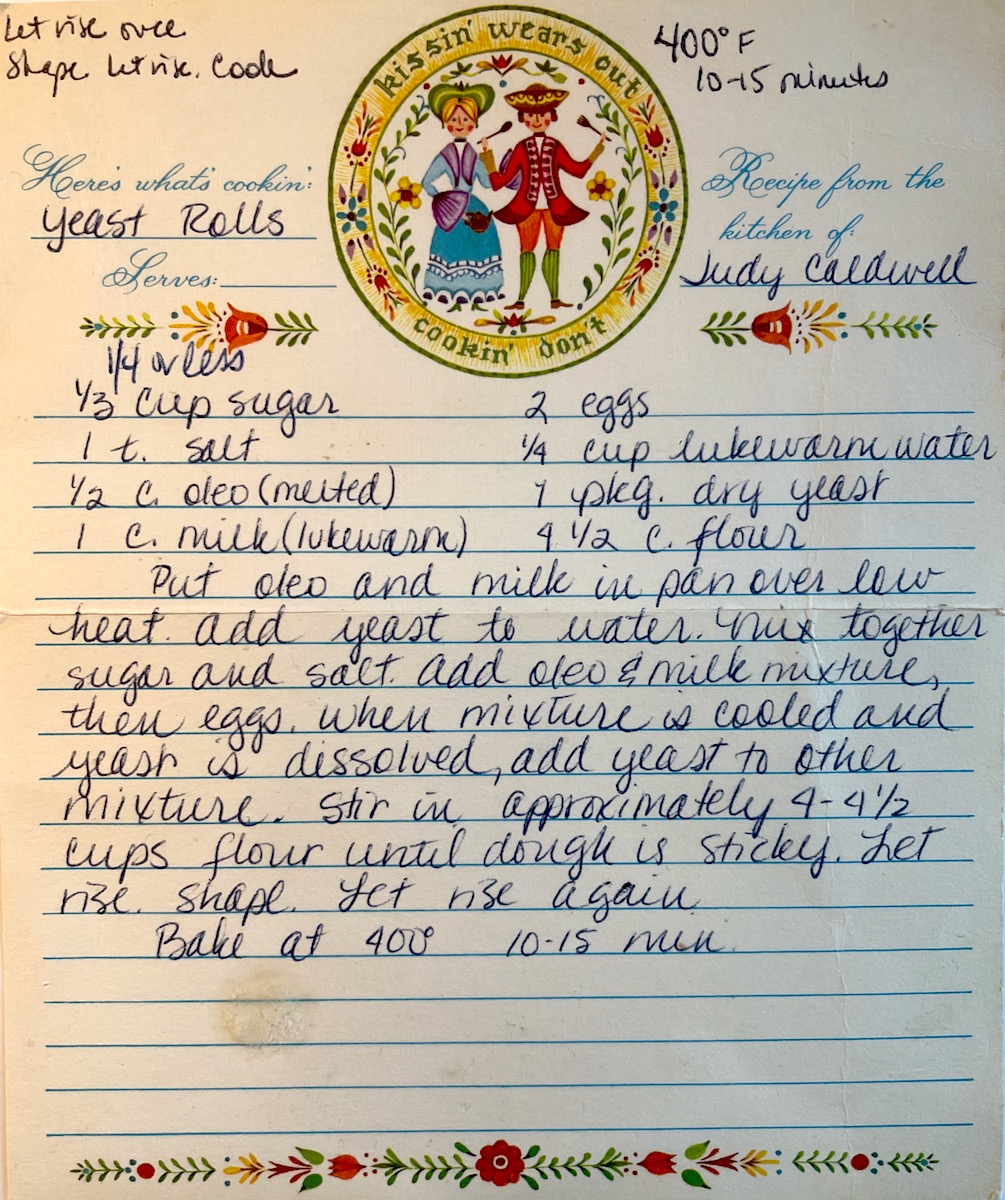
My ancient recipe card with my mother’s recipe says it came from Judy Caldwell, who must have been one of her friends. I’ve modified it since, not only to cut down on the sugar, but also to make it easier to mix.

To shape crescents, divide dough in half and roll into a circle. Cut into 12-16 slices, and roll up from the bottom. I also brushed a bit of melted butter on the tops when they came out of the oven.

Dinner Rolls, from Barbara Sessions

1/4 cup lukewarm water
1 package dry yeast
1 cup milk
1 stick REAL butter
2 eggs
1/4 cup sugar
1 teaspoon salt
4 1/2 cups flour
Optional: 2 Tbls. melted butter to brush on top

In a mixing bowl, place 1/4 cup lukewarm water (110-115 F). Sprinkle one package of dry yeast over the top, or 2 1/4 teaspoons, if measuring from bulk. Let sit until yeast blooms and softens.

Meanwhile, measure 1 cup whole milk in a glass measuring cup. Add 1 stick real butter, cut into pieces. Microwave until warm (no hotter than 115; let sit until cool if it measures too warm). Pour lukewarm milk/butter mixture into bowl with yeast.

Add 2 eggs, mix. Add 1/4 cup sugar and 1 teaspoon salt. Mix.

Add 1 1/2 cups flour and mix; then add the rest of the flour in batches, but letting it remain sticky. I switched to a dough hook when I had 3 1/2 cups in, and added flour until the dough cleaned the bowl. Don’t overmix, and don’t add extra flour.

Remove beaters and cover dough with plastic wrap. Let it rise until double (about an hour). Divide into two, and on floured surface, roll out and shape (see note, above, for crescent rolls). Let rise.

Bake 12 minutes in a preheated 400 F degree oven. When rolls come out of the oven, brush tops with a small amount of melted butter.

Fall Corn Chowder

Thanksgiving 2022 was spent at my daughter’s home in a small town in Arizona. While we were there, two farm-to-table brown paper sacks were dropped off. I thought it was like Christmas with all this fresh produce from Rosebud Farms: pomegranates, red potatoes, cilantro, fresh baby greens, apples and several perfectly small ears of corn — baby corn. We served a salad that night with the fresh greens and arils, as earlier that afternoon I’d taught the charming granddaughter how to cut and submerge the pomegranate to pull out the tiny bits of red without getting it all over her.

As we were leaving the next morning, my daughter graciously gifted me the small ears of corn. We drove across the Mohave/Mojave, unpacked, and tired that night, I wanted something easy for dinner: Corn Chowder with fresh tender kernels of corn.

Fall Corn Chowder
4-5 small ears of corn, shucked, sliced off the cob (about 3 cups)**
2 slices of maple bacon, cut into small pieces
4 white rose potatoes, cut into bite-sized pieces
1/2 large onion (or 1 small onion) finely chopped
1/2 red or yellow pepper, finely chopped
1/4 cup flour
approximately 6 cups chicken broth (three 14-oz cans), divided
1/2 teaspoon celery seed
pinch of red pepper flakes
salt and pepper to taste

  1. In a medium saucepan, place the potatoes, covering with about 3 cups of chicken broth. You just want to cover the potatoes. The other chicken brother will be used later. Bring to a boil, then let simmer while you start the soup.
  2. In a heavy soup pot, cook the bacon, stirring to separate, but pulling just before it gets too brown. Remove bacon to drain on a plate topped with paper towels.
  3. To the bacon grease, add the onion and the pepper, and sauté until tender, without letting it burn or get brown.
  4. Sprinkle the flour over the top of the vegetables. We’ll be making a type of roux, where you cook the rendered fat from the bacon with flour, to take out the floury taste of the thickener. Stir, and add salt and pepper. It will thicken up really quickly.
  5. Using about 1/4 cup of reserved chicken broth at a time, add to the roux and vegetables. The first batch will be absorbed quickly. Add some more. And more, until you start to have a thickened paste.
  6. Check the potatoes for doneness, then pour the entire pan (potatoes and hot broth) into the soup pot, stirring all the while. It should separate, then thicken back again.
  7. Add more chicken broth until you like the consistency (I used all 6 cups), and simmer on low while you add:
    • cut corn
    • pinch of red pepper flakes
    • 1/2 teaspoon celery seed
    • salt and pepper to taste
  8. Serve when corn is tender but still has some bit to it. We like to grind more pepper over the top, and sprinkle it with soup crackers.

**NOTE: If you are using summer corn, go for the most tender ears you can find, or cut back on the amount of corn to 2 1/2 cups or thereabouts.

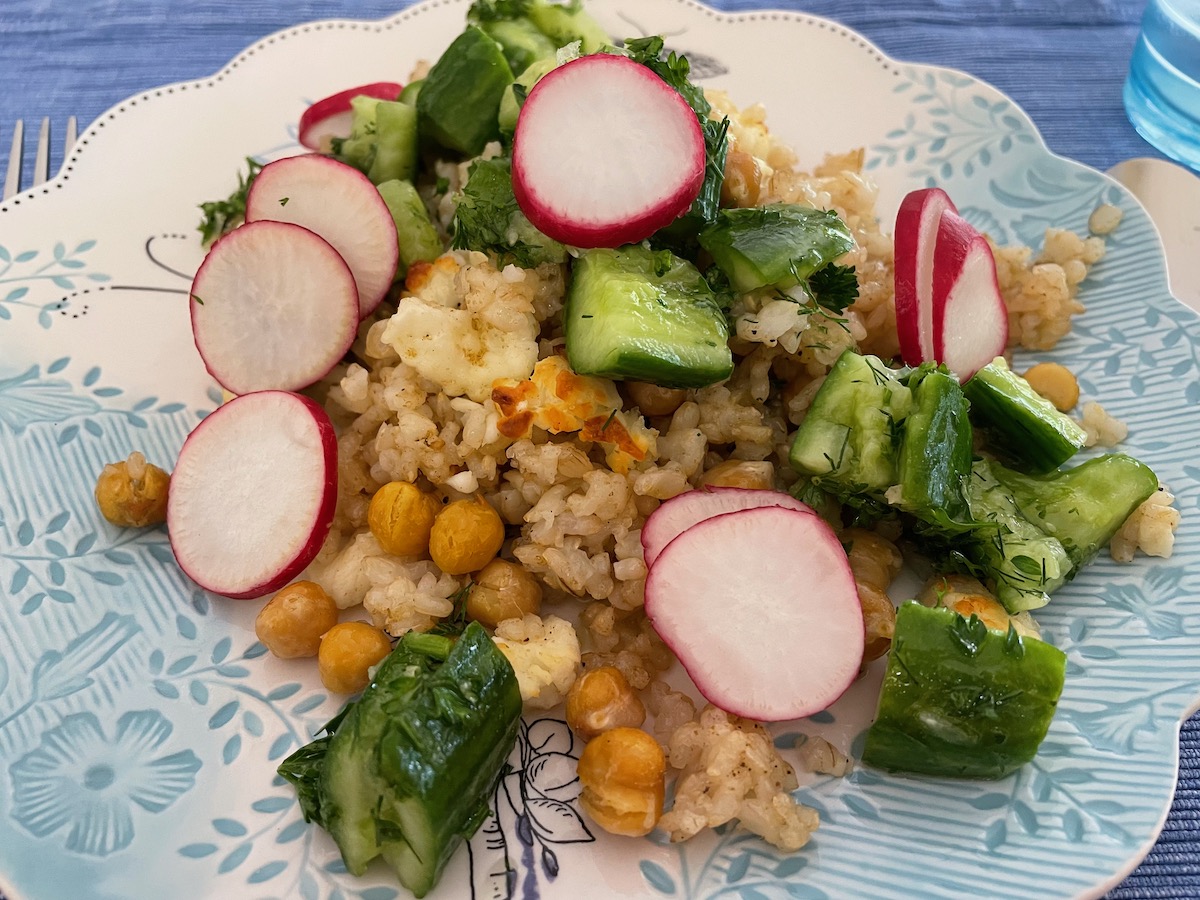
Crispy Grains and Halloumi With Smashed Cucumbers

Since I cook a lot from the New York Times Cooking website, I get to know writers who make recipes that we’ll like. One of those is Ali Slagle, who introduced us to halloumi, a low-lactose cheese that kind of squeaks in your mouth. We’ve grown to really like this meatless recipe.

INGREDIENTS
3 cups cooked grains (such as brown rice, wheat berries, farro or a mix), shaken or patted dry (we use brown rice)
8 to 9 ounces halloumi or feta, torn into 1/2- to 1-inch pieces
1 (15-ounce) can chickpeas, drained, rinsed and shaken dry
4 Persian or mini seedless cucumbers
Kosher salt
2 limes or lemons or 1 grapefruit
1⁄2 cup finely chopped cilantro, dill or parsley leaves and stems, or a mix
1⁄4 cup extra-virgin olive oil, plus more as needed
1 teaspoon ground cumin or coriander
Black pepper
Sliced radishes (optional)

PREPARATION
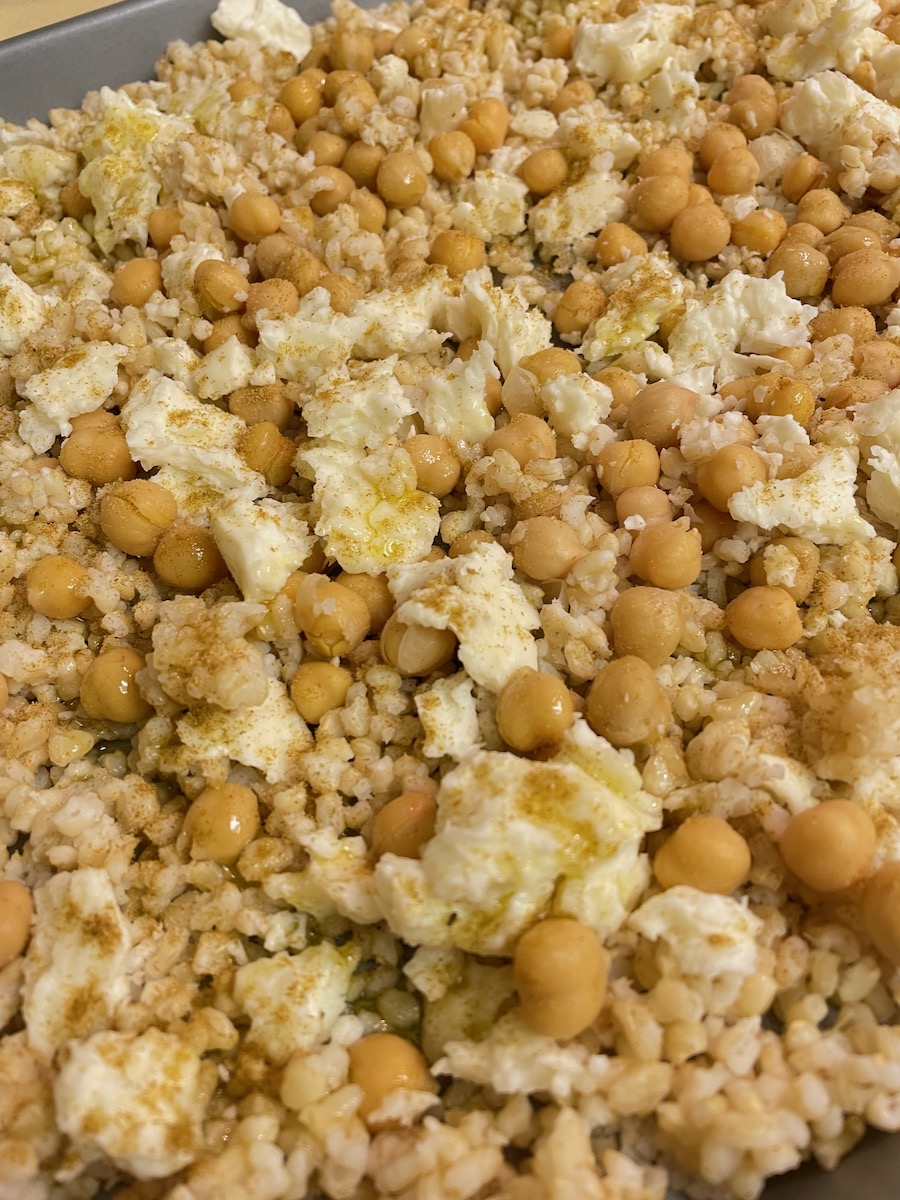
Step 1 • Heat the broiler on high with a rack six or fewer inches from the heat source. Put the grains, halloumi and chickpeas on a sheet pan to air dry while you prepare the other ingredients. (You can do this up to a day ahead and refrigerate the sheet pan.)

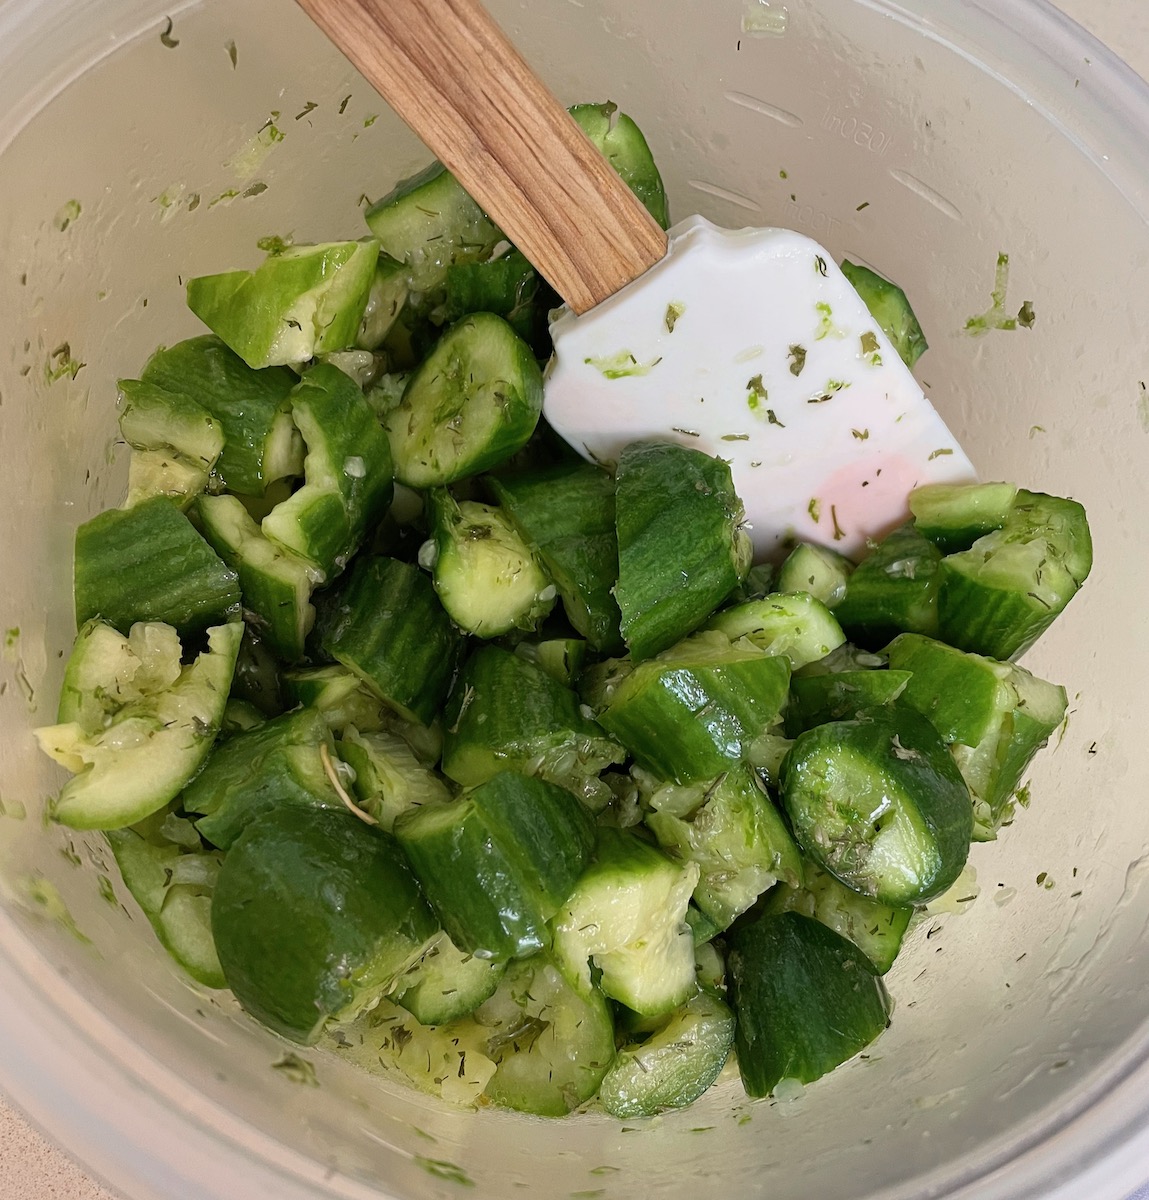
Step 2 • Meanwhile, smash the cucumbers with the side of your knife until they’re craggy and split. Coarsely chop into irregular 1/2-inch pieces. Transfer the cucumbers and any liquid on the cutting board to a small bowl and season with salt. Finely grate about 1 teaspoon of the citrus zest over the cucumbers, then squeeze in 3 tablespoons juice. Cut any remaining citrus into wedges for serving. Add the herbs and 1 tablespoon olive oil, stir to combine and set aside. (Cucumbers can be prepared up to 3 hours in advance.)

Step 3 • Add remaining 3 tablespoons olive oil and the cumin to the sheet pan. Stir to combine. Season with salt and pepper, spread in an even layer, and broil, shaking the pan occasionally or tossing with a fork, until the chickpeas start to pop and everything is crisped and golden brown, 7 to 10 minutes.

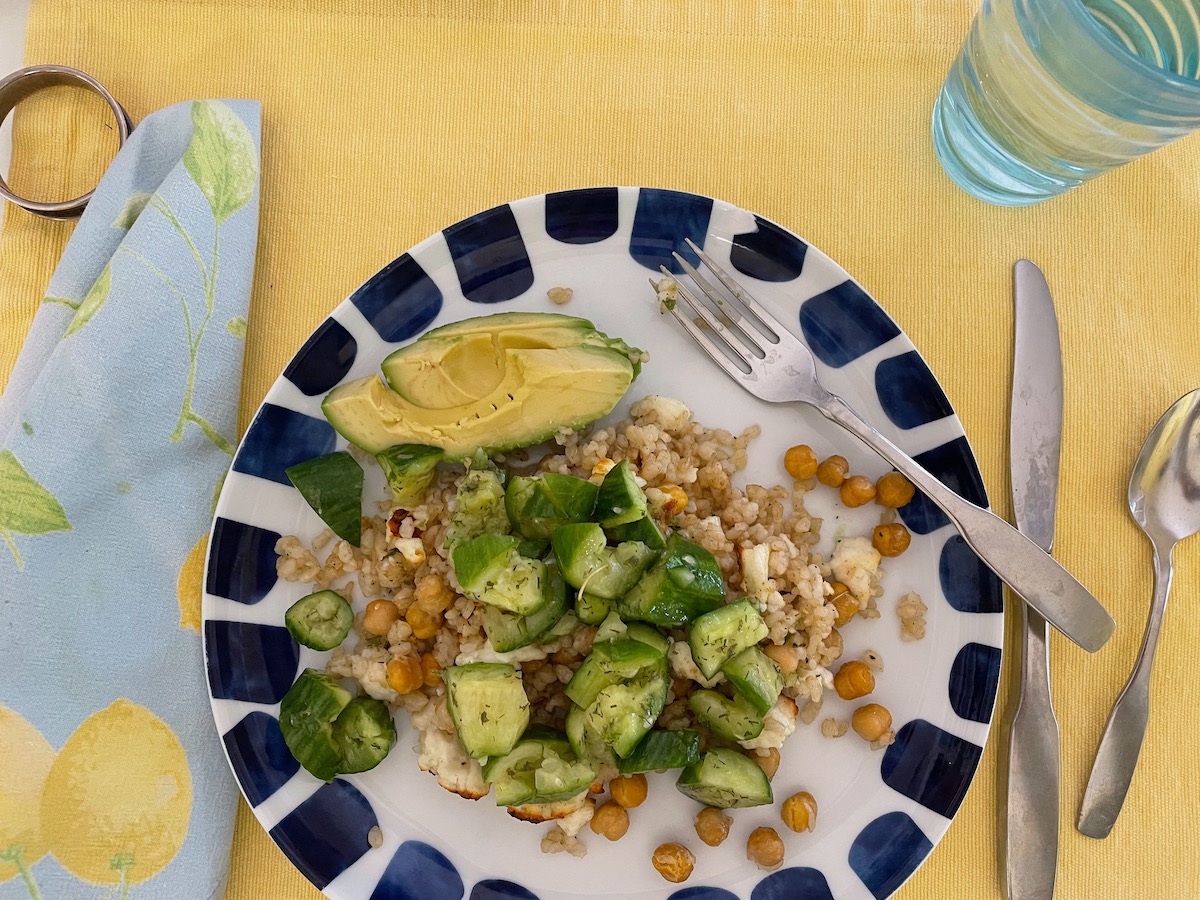
Step 4 • Serve the grain-bean mixture topped with the cucumbers and the dressing in the bowl. Season to taste with salt, pepper, citrus juice and olive oil.

Note: We have also served it with some sliced avocados.

Spicy Ginger Pork Noodles With Bok Choy

This recipe, by New York Times writer Melissa Clark, reminds us of going for dumplings; however, the shop is quite far from our home so this will have to suffice. I didn’t have any black vinegar for the final topping, so truthfully, I just left it off. In her notes, Ms. Clark says balsamic can be a substitution, although it is a bit sweeter.

INGREDIENTS:
12 ounces baby bok choy (3 or 4 small heads)
1 ounce ginger root (1 fat 2-inch- thick knob)
Kosher salt
8 ounces rice noodles, not too thin
2 tablespoons peanut or safflower oil
1 pound lean ground pork
1⁄4 cup plus 1 1/2 tablespoons soy sauce
2 tablespoons rice wine vinegar
1⁄2 cup thinly sliced scallions
3 garlic cloves, finely chopped
1 fresh Thai or habanero chile, seeded if desired, thinly sliced
2 tablespoons toasted sesame seeds
1 1⁄2 teaspoons sesame oil, more for drizzling
Cilantro or torn basil, for serving Black vinegar, for serving

PREPARATION:
Step 1 • Trim bok choy and separate dark green tops from white stems; leave tops whole and thinly slice stems. Peel ginger and finely chop half of it. Slice remaining ginger into thin matchsticks if using vinegar garnish.

Step 2 • Bring a large pot of salted water to a boil. Add noodles and cook according to package instructions. Drain and run under cool water; drain again.

Step 3 • Heat 1 tablespoon peanut oil in a large skillet over medium-high heat. Add pork and cook, breaking up with a fork, until golden and cooked through, about 10 minutes. Season with salt, 1 1/2 tablespoons soy sauce and 1/2 tablespoon rice wine vinegar. Use a slotted spoon to transfer meat to a bowl.

Step 4 • Add remaining 1 tablespoon oil to skillet. Stir in half the scallions, the finely chopped ginger, the garlic and the chile. Cook until fragrant, about 1 minute. Add bok choy stems and a pinch of salt. Cook until bok choy is almost tender, about 2 minutes. Toss in leaves and return pork to skillet.

Step 5 • Toss noodles, remaining 1/4 cup soy sauce and 1 1/2 tablespoons rice vinegar into the pan. Cook until just warmed through.

Step 6 • Transfer to a large bowl and toss with remaining scallions, sesame seeds, sesame oil and herbs.

Optional: In a small bowl, combine ginger matchsticks with just enough black vinegar to cover. Serve ginger mixture alongside noodles as a garnish.

Salmon-Rice Bowl

This is my favorite one-pot meal, although there is some chopping of toppings. It comes together quickly, and is also good the next day.

Ingredients:

¼ cup unseasoned rice vinegar
3 tablespoons granulated sugar
1 teaspoon kosher salt, plus more for seasoning
1 ½ cups sushi rice (short-grain white rice), rinsed until water runs clear
1 ½ pounds skinless salmon fillet, cut into 1-inch cubes
½ teaspoon toasted sesame oil
¼ cup low-sodium soy sauce
3 tablespoons distilled white vinegar
2 tablespoons safflower or canola oil
2 tablespoons coarsely chopped scallions
2 tablespoons minced fresh ginger (from one 2-inch piece)
3 Persian cucumbers, thinly sliced
8 ounces green coleslaw mix (about 3 packed cups) OPTIONAL
1 avocado, halved, pitted and thinly sliced or cut into chunks
Nori Komi Furikake seasoning

Prepare:

  1. In a large saucepan, combine rice vinegar, sugar and salt; stir to dissolve the sugar. Add the rice and 1 3/4 cups water, and mix well. Bring to a boil over high heat, then cover and reduce heat to low. Cook until rice is tender and most of the liquid is absorbed, about 20 minutes.
  2. In a small bowl, toss salmon with 1/4 teaspoon sesame oil and season with salt. Once rice is tender (after about 20 minutes), arrange salmon in an even layer on top of rice. Cover and steam over low heat until fish is cooked to medium, about 12 minutes longer.
  3. Meanwhile, in a small bowl, combine soy sauce, white vinegar, safflower oil, scallions, ginger and the remaining 1/4 teaspoon sesame oil. Mix well, and season with salt.
  4. Scoop salmon and rice into bowls. Top each with some cucumbers, coleslaw mix (if using) and avocado. Drizzle with the vinaigrette. Top with seasoning.

Cold Noodles with Tomatoes

It had been a hot week, with all daytime temperatures approaching — or over — 100 degrees. I saw this on the New York Times Cooking website, and we decided to try it. That first time we garnished it with a soft-boiled egg. Wrong. The “broth” was barely there, so this week we made it again, with the revisions shown below. Much better, and perfect for a really hot day. We like the addition of the shrimp, but you could leave them off.

Last note: I usually toast my sesame seeds in a small non-stick skillet, swirling and tossing until they look a slightly darker color. But on our last trip to the Ranch 99 Market near us they had a large container of Toasted Sesame Seeds. We brought it home with us and used it this go-round.

Gather Ingredients:

  • 2 pints ripe cherry tomatoes, halved
  • 2 teaspoons kosher salt (Diamond Crystal)
  • 12 to 14 ounces somyeon, somen, capellini or other thin wheat noodle
  • 1/2 cup rice vinegar
  • 1/4 cup soy sauce
  • 1/4 cup granulated sugar
  • 2 large garlic cloves, finely grated
  • 1 teaspoon Dijon mustard
  • 1 teaspoon toasted sesame oil
  • 2 cups cold filtered water
  • 1 tablespoon toasted sesame seeds
  • 2 to 4 radishes, thinly sliced
  • 2 scallions, thinly sliced at an angle
  • 2 Persian cucumbers, sliced
  • 1/2 cup crushed ice
  • 1/2 pound raw shrimp, tails off, deveined, cut in half

Prepare:

  1. In a large bowl, toss together the tomatoes and salt. Let sit until juicy, at least 10 minutes.
  2. Meanwhile, bring a large pot of water to a boil. Cook the noodles according to package instructions, drain and rinse under cold water. Set aside.
  3. In a small saucepan, poach the shrimp briefly in boiling salted water. Remove promptly and rinse under cold water. Set aside.
  4. In small bowl, whisk together vinegar, soy sauce, sugar, garlic, mustard and sesame oil. Add to the tomatoes, and toss with a spoon until well combined. Stir the filtered water into the tomatoes and sprinkle the surface of the broth with the sesame seeds, radishes and scallions.
  5. Right before serving, add the ice to the broth. Divide the noodles among bowls, and ladle in the broth and any unmelted ice, making sure each serving gets a nice sprinkling of tomatoes, radishes, cucumbers, scallions and sesame seeds.

Donabe

A light, refreshing and delicious soup. I add a little bit of sriracha sauce to liven it up, but my husband liked it just as it was, although we agree that this should be salted to taste (in other words, add more). According to the New York Times, from where I adapted this recipe, donabe refers to the clay pot in which it is cooked as it keeps the soup hot longer. My enameled cast iron pot did just fine.

INGREDIENTS

  • 4 cups low-sodium chicken broth
  • 3 garlic cloves, thinly sliced
  • 1 (2-inch) piece ginger, peeled and halved
  • 1 ½ pounds boneless, skinless chicken thighs, sliced into 1/8-inch-thick strips
  •  Kosher salt and black pepper
  • 8 ounces tender mushrooms, such as maitake, beech or enoki, or a combination, stemmed and broken into large clusters
  • 6 ounces napa cabbage, chopped into 2-inch pieces (about 2 cups)
  • 6 ounces daikon, peeled, halved lengthwise and sliced crosswise 1/4-inch thick 
  • 3 scallions, cut into 1-inch lengths
  • 2 large carrots, peeled and thinly sliced
  • ¼ cup ponzu
  • ½ teaspoon toasted sesame oil
  • Chinese wide noodles, cooked according to package directions, then drained

PREPARATION

  1. In a large Dutch oven, combine broth, garlic and ginger. Season chicken with salt and pepper, and add to pot. Bring to a boil over high, skimming the foam and fat that rises to the top and discarding it. Reduce heat to medium-low and cook, occasionally stirring and skimming, until foam no longer appears in the broth, about 5 minutes. 
  2. Add mushrooms, cabbage, daikon, scallions and carrot to the pot, arranging them in sections, and season with salt. Cover and simmer over medium to medium-low heat (maintain a good simmer, but do not boil) until chicken is cooked through and vegetables are tender, about 10 minutes. Discard ginger. Season to taste with salt and pepper.
  3. Meanwhile, in a small bowl, combine ponzu, sesame oil and a tiny pinch of red pepper flakes, and mix well.
  4. Also meanwhile, cook your noodles. We liked the version shown below.
  5. Divide donabe among four bowls. Drizzle with some of the ponzu sauce and serve warm.

The noodles were first put in the bottom and the soup was ladled over it. This donabe is even better the next day, we think. We have also developed an affinity for daikon radishes, that when cooked remind us of a cross between a mild radish, a turnip, and a potato.

Cacio e Pepe


I first had this dish when my husband and I went to Eataly in Los Angeles. The first entreé was way too salty, so even though I never do this, I alerted the wait staff to bring something else (the waiter confided in me that they have a new chef and a lot of food was salty). So I chose this, and loved it.

We saw it in Trader Joe’s in the frozen food aisle and that was delicious, too. Then pandemic-supply-side problems hit, and we couldn’t get it. So I found three recipes, combined and came up with this. Enjoy!

Cacio e Pepe | 2-4 servings

Ingredients

  • Kosher salt
  • 8 ounces dry pasta–we used Linguine Fini, from Barilla
  • 3 Tbs. butter
  • 1 teaspoon freshly ground black pepper
  • 3/4- 1 cup of Pecino Romano or other hard cheese
  1. Bring 2 quarts water to boil in a pot; add salt, then bend in your pasta. Cook, stirring occasionally, until it’s about two minutes before it’s tender. Drain, reserving 1 cup water (I saved about 1 1/2cups).
  2. In the meantime, in a large skillet or cookware, melt 2 Tbls. butter over medium heat. Add pepper and cook, stirring with a rubber spatula until toasted, about 1 minute.
  3. Add 1/2 cup of pasta water to the skillet and bring to a simmer. Add pasta to the skillet and using tongs, swirl the pasta mixture together. Add more pasta water if it looks dry.
  4. Grate the cheese finely, and add to pasta mixture a handful at a time, stirring with a set of tongs so you can lift the pasta to help it incorporate the ingredients. Add about 1/4 cup more pasta water. Cook and swirl it with tongs until cheese melts, sauce coats the pasta and the pasta is al dente. (Again, if it looks dry, add more pasta water, about 2-3 Tablespoons at a time.)

This is the process photo of what it looks like in the pan.