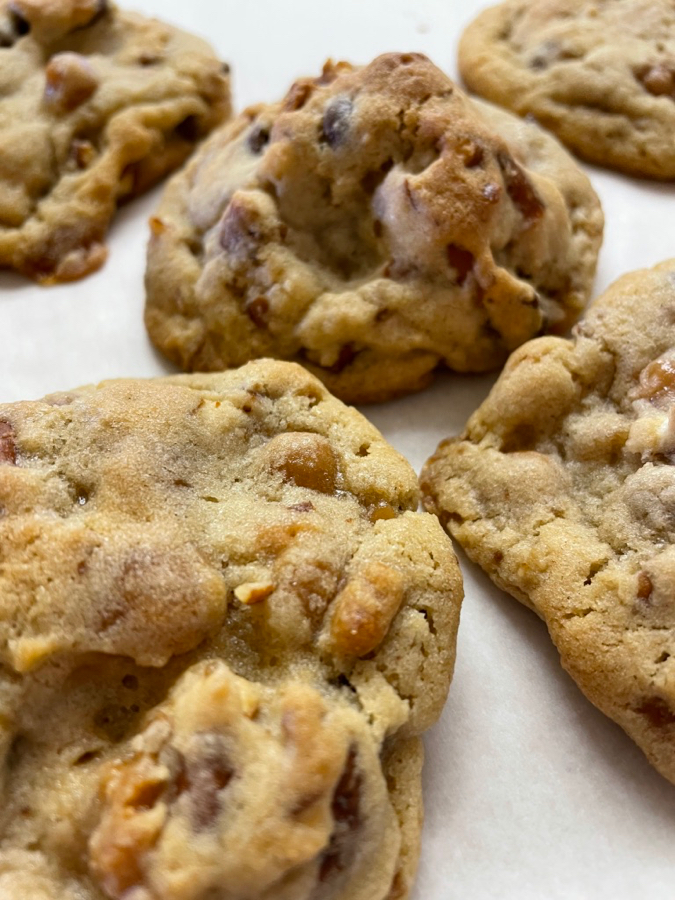
I loved the cookies from Sweet Mac Shop, but found them a tad too sweet to my tastes. So I made some adjustment to some of the measurements, but kept the interesting combination of pretzels, caramel bits and chocolate chips. I also subbed out some whole-wheat flour for the all-purpose flour for a bit chewier texture. These are hard to resist!
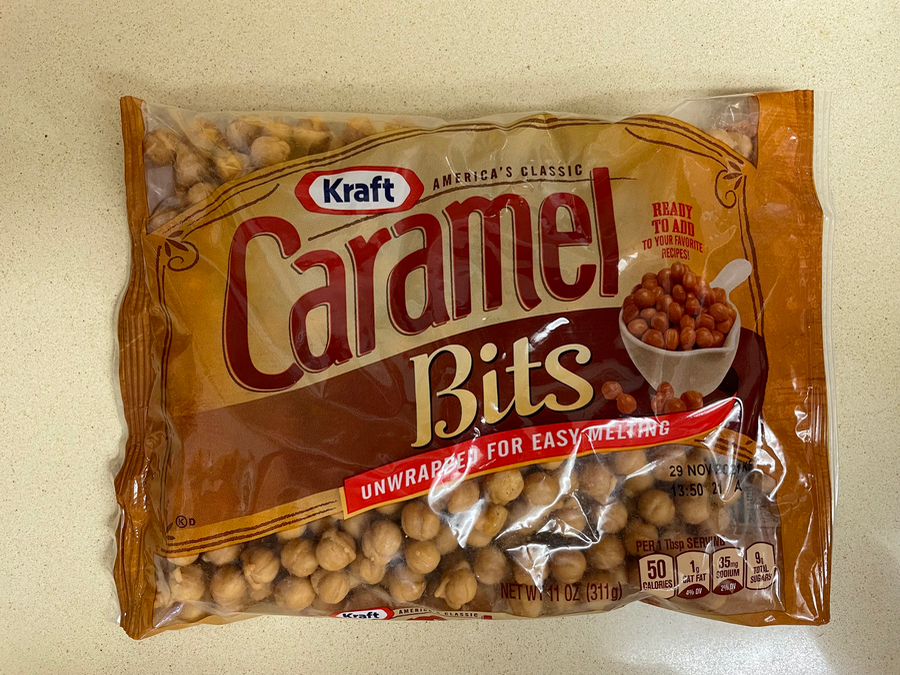
I buy these at Walmart.
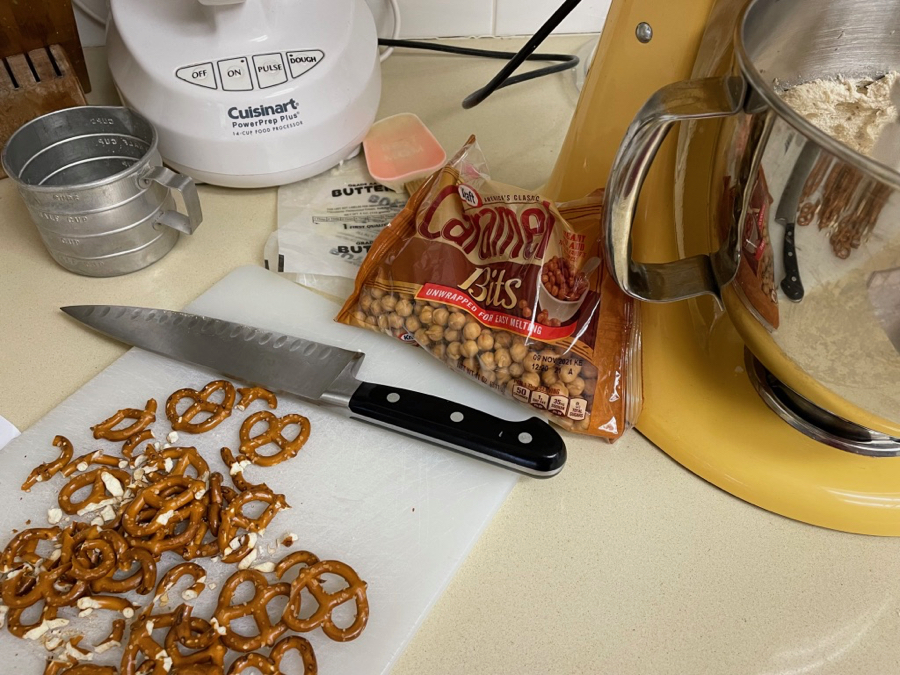
Ingredients 1 cup butter, still a little cold, but soft 3/4 cup brown sugar, packed 1/2 cup white sugar 1 tsp vanilla extract 2 large eggs 1 cup whole wheat flour 1 1/2 cups all-purpose flour 1 tsp. baking soda 1 tsp. baking powder 1/2 tsp. salt 1 1/2 cups semi-sweet chocolate chips 1 1/2 cups chopped pretzels 1 bag Kraft Caramel Bits (11 oz)
Instructions Preheat oven to 400 degrees.
Place butter in a stand mixer with paddle attachment, then add both sugars and beat for 4-5 minutes until light and fluffy. Add in eggs and vanilla and beat one more minute.
Mix together the whole wheat flour with the baking soda, baking powder and salt. Whisk together and add slowly to mixer on low speed. Add the all-purpose flour; mix just to combine.
Coarsely chop pretzels. Add chocolate, caramel, chopped pretzels to the cookie mixture and just mix until combined. Over-mixing will break down the pretzels.
Sweet Mac Shop uses the OXO size 20 scoop to make all her cookies evenly shaped, and I did the same, scooping them out on a parchment-covered baking sheet. Pop into freezer for 10 minutes. (I store the tray of cookies in the freezer and bring them out in between to set up a new batch.)
Pull out 9 balls of dough at a time and space them on a half-sheet baking sheet lined with parchment paper. Bake for 8-12 minutes.
The tongue-in-cheek joke in our house is that this is known as “Elizabeth’s Award-winning dessert.” I was dating my husband at the time, and served some to him, proudly announcing that it had won a blue-ribbon at the fair. I was beaming. True to his scientific ways and analysis (in every aspect of his life), he asked, “And how many entries were there?” I pulled a face. He went on eating it. I’ll never tell how many entries in my category there were; to me it’s a blue-ribbon winner all the way.
Ingredients: 1 pound REAL butter, melted 2 1/2 cups chopped walnuts 1/8 cup sugar 3 tsp. cinnamon 1 pound filo dough (found in frozen section of grocery store, thaw in fridge before using)
Method: Mix together nuts, sugar and cinnamon, set aside.
Brush a cookie sheet with some of the melted butter. Place one sheet of filo carefully in the pan. Brush the sheet with melted butter. Repeat until there are 6 layers of filo.
Sprinkle 1/3 of the nut mixture on top of this layer.
Layer two leaves of filo on top of nuts. Brush with butter. Layer on 4 more sheets, one at a time, brushing each with butter.
Sprinkle 1/3 the nut mixture on top of that last layer.
Layer two leaves of filo on top of nuts. Brush with butter. Layer on 4 more sheets, one at a time, brushing each with butter.
Sprinkle last 1/3 nuts on top. Repeat layering of filo until all leaves are used. Brush top layer with butter. With a small sharp knife, score the top of the pastry with parallel diagonal lines about 1/2-inch deep and 2 inches apart, then cross them diagonally to form diamond shapes. Bake in the middle of a 350°F oven for 30 minutes. Reduce the heat to 300°F and bake for 45 minutes longer, or until the top is crisp and golden brown.
Meanwhile, make the syrup: 1 1/2 cups sugar 3/4 cup water 1 tablespoon FRESH lemon juice 1 tablespoon honey
Combine sugar, water and lemon juice in a small saucepan and, stirring constantly, cook over moderate heat until the sugar dissolves. increase the heat to high and, timing it from the moment the syrup boils, cook briskly, uncovered, for about 5 minutes. Remove the pan from the heat and stir in the honey. Pour the syrup into a pitcher or other pouring container and set aside.
When the baclava is done, remove it from the oven and pour the syrup over it, slowly, up and down all the rows and across. Cool to room temperature, and just before serving, cut through the scored lines to the bottom of the pan, yielding diamond-shaped pieces.
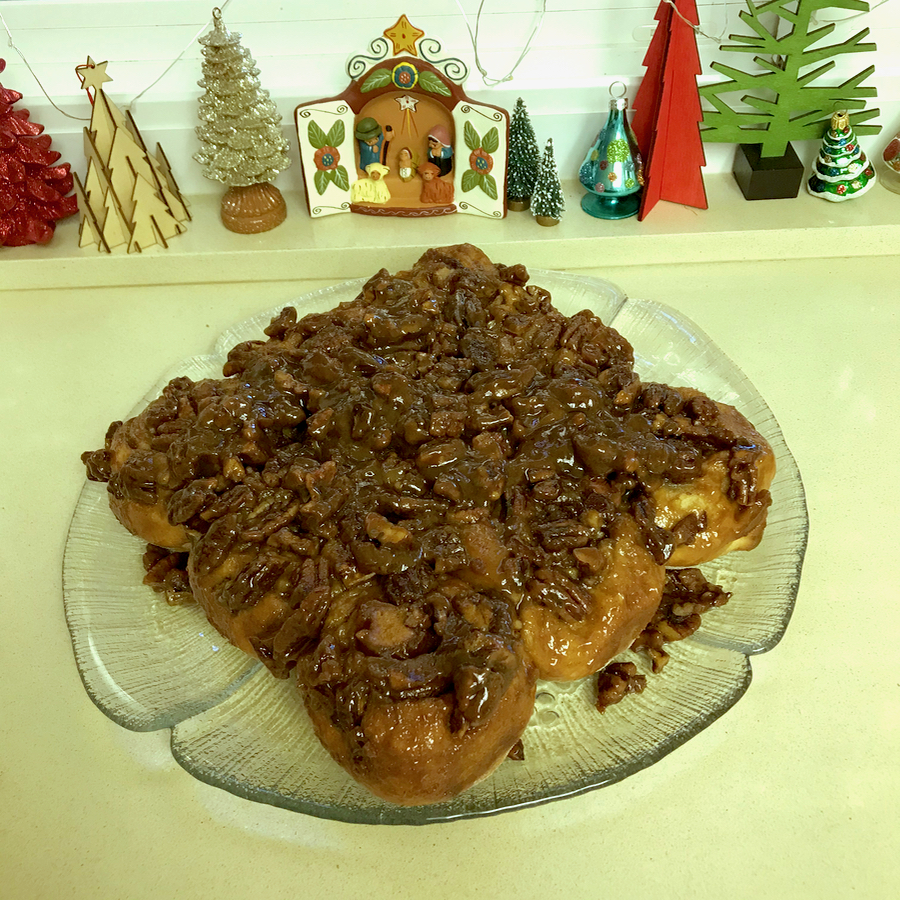
These are a winner, all the way around. Perfectly sticky, soft dough, just the right amount of spice all combine for a perfect Christmas morning cinnamon roll. The original recipe comes from Joy Wilson, via the Washington Post, 2020.
Sticky Pecan Rolls
If you want a fresh-baked batch of rolls when you wake up, proceed with the recipe through the step when you place the cut rolls into the pan with the sauce. Cover the pan with lots of plastic wrap and refrigerate overnight. In the morning, let the rolls come to room temperature for 30 to 40 minutes while you preheat the oven. Then bake as directed.
Ingredients
For the dough: 2¼ teaspoons instant yeast 3 tablespoons warm water Scant 3 cups (360 grams) flour, plus more for dusting the counter ½ cup (120 milliliters) whole milk, at room temperature, or more as needed ⅓ cup (65 grams) lightly packed light brown sugar 1 large egg, lightly beaten 1 teaspoon vanilla extract ½ teaspoon kosher salt 4 tablespoons (57 grams) unsalted butter, at room temperature, cut into medium chunks
For the filling inside the pecan roll: ½ cup (99 grams) lightly packed light brown sugar 1 tablespoon ground cinnamon 1 teaspoon freshly grated nutmeg ⅛ teaspoon ground cloves ½ teaspoon kosher salt 6 tablespoons (85 grams) unsalted butter, at room temperature
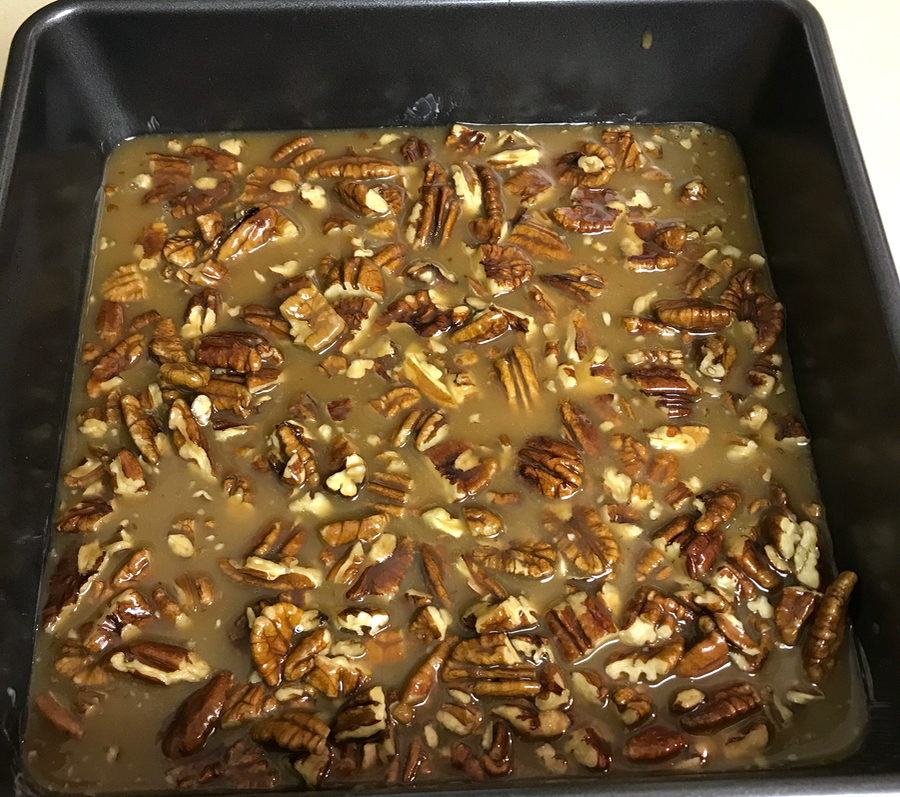
For the sticky topping: ½ cup (120 milliliters) heavy cream ⅓ cup (113 grams) honey 2 tablespoons (28 grams) unsalted butter ¼ teaspoon kosher salt 1¼ cups (125 grams) coarsely chopped pecans
Make the dough
In the bowl of a stand mixer fitted with a dough hook, mix the yeast with the warm water until combined. Add the flour, milk, brown sugar, egg, vanilla and salt. Using a silicone spatula, stir the mixture into a shaggy dough.
Place the bowl on the stand mixer and mix on low speed, slowly adding chunks of butter as the dough comes together. [Note: This is kind of weird, and doesn’t look as if the butter will incorporate, but it does.] If the dough looks too dry, add an additional tablespoon of milk. Increase the mixer speed to medium and knead the dough until it begins to pull away from the sides of the bowl, about 4 minutes.
Transfer the dough to a lightly floured work surface and knead by hand into a cohesive, relatively smooth ball, about 3 minutes.
Place the dough in a large, greased bowl, cover with plastic wrap and allow to rise in a warm place until doubled in size, 1 to 1½ hours.
Make the filling:
While the dough rises, in a medium bowl stir together the brown sugar, cinnamon, nutmeg, cloves and salt until combined. Reserve the room-temperature butter for use in assembling the sticky rolls.
Make the topping:
In a medium saucepan over medium heat, combine the cream, honey, butter and salt and bring to a simmer. Reduce the heat to low and let the mixture simmer gently until slightly thickened, about 3 minutes. Remove from the heat and stir in the pecans.
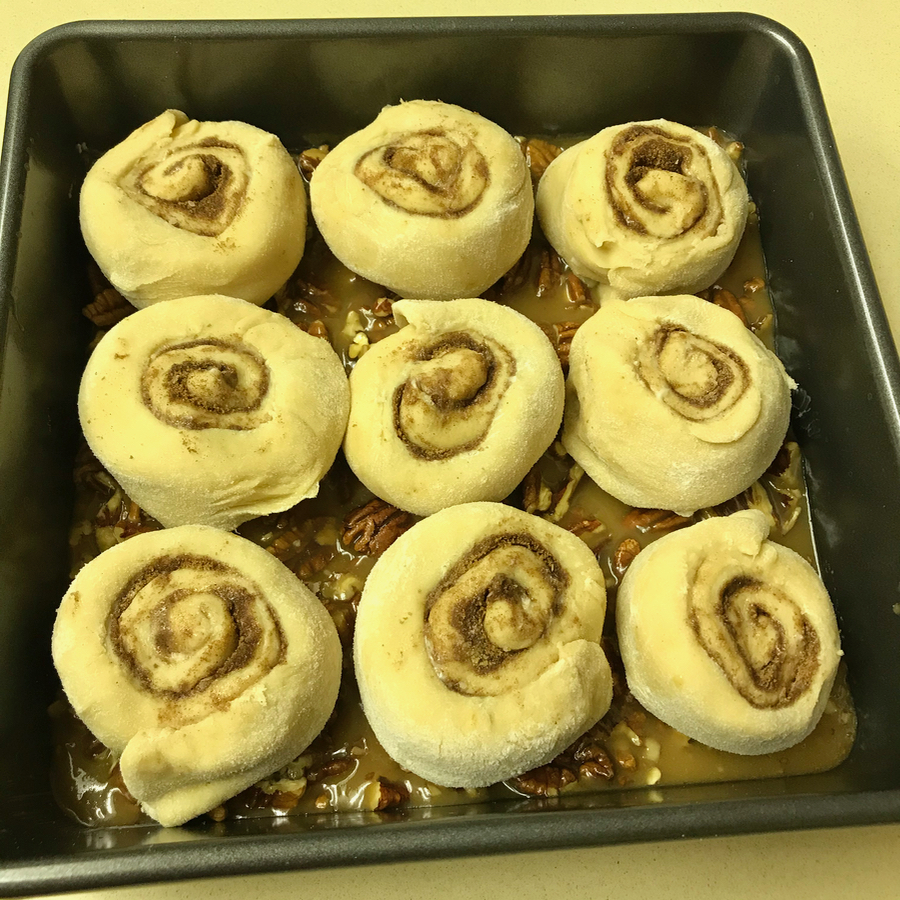
Generously flour a work surface and unwrap the dough onto it. Using a floured rolling pin, roll the dough into a rectangle about 12 by 15 inches. Spread the reserved butter over the dough and sprinkle the filling mixture on top. Starting with the long edge of the dough, lift and roll it into a tight log, seam-side down. Using a sharp knife, trim off the uneven edges. Slice the log into 9 equal pieces.
Pour the prepared pecan topping into a 9-inch greased square pan. Nestle the cut rolls over the topping. [Note: I slightly flattened out the rolls into a bit larger circle when I placed them in the pan.] Cover loosely with a clean kitchen towel and allow to rest while the oven preheats, about 20 minutes. (To store overnight, skip the 20-minute rest, cover the rolls with lots of plastic wrap and keep in the refrigerator overnight. Let come to room temperature before baking.)
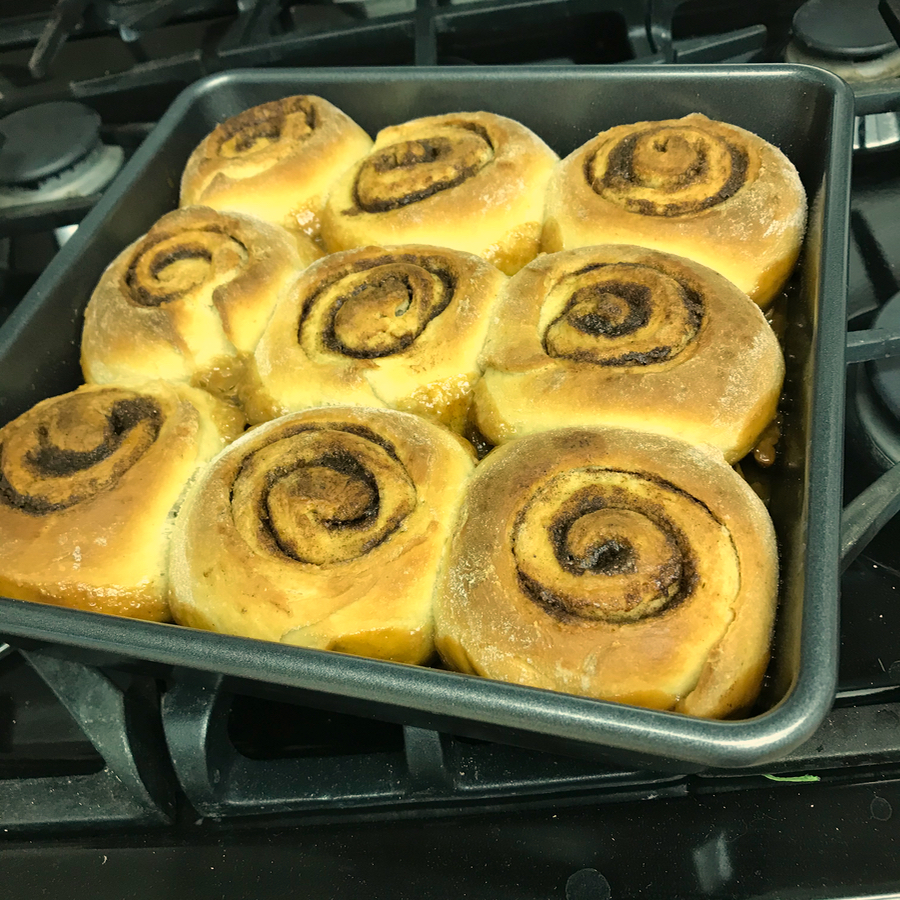
Position the rack in the upper third of the oven and preheat to 375 degrees.
Uncover the rolls and bake for 30 to 32 minutes, until golden brown and bubbling. Remove from the oven and let cool in the pan for 10 minutes. While the rolls are still warm, run a butter knife around the edges of the pan and invert the entire pan onto a large serving platter. Scrape any nuts or caramel that remain in the pan on top of the rolls. Serve warm.
This recipe originally comes from Bon Appetit, and was in their special Thanksgiving Issue from 2014. A classic issue, if there ever was one. It also had the Spatch-cocked Turkey recipe.
4 pounds Yukon Gold potatoes, peeled, cut into 2” pieces 1 tablespoon kosher salt, plus more 1½ cups whole milk 3 sprigs thyme (optional) 2 bay leaves ¾ cup (1½ sticks) unsalted butter, plus more for serving Freshly ground black pepper
Preparation:
Place potatoes in a large pot and pour in cold water to cover by 1”. Add salt and bring to a boil. Reduce heat and simmer until potatoes are very tender but not saturated or crumbly, 20–25 minutes (boiling will lead to waterlogged pieces).
Drain potatoes, reserving ½ cup cooking liquid if making potatoes ahead. Return potatoes to pot and set over low heat. Gently stir until dry, about 1 minute.
Meanwhile, heat milk, thyme sprigs, if desired, bay leaves, and ¾ cup butter in a small saucepan over medium heat until butter is melted. Remove from heat.
Pass hot potatoes through a ricer into a large bowl (if allowed to cool, the potatoes will become gummy).
Remove herbs from warm milk mixture; discard. Gradually add milk mixture to potatoes, stirring vigorously with a wooden spoon until combined and smooth; season with salt and pepper. Serve mashed potatoes with a few pats of butter on top.
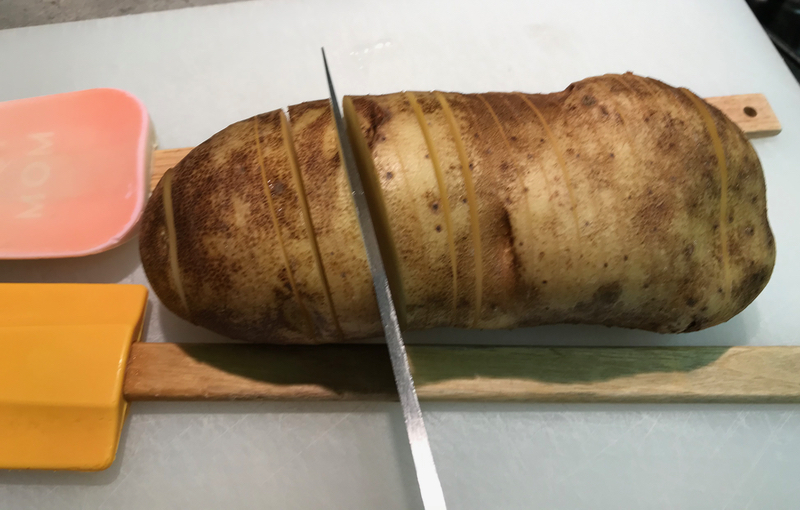
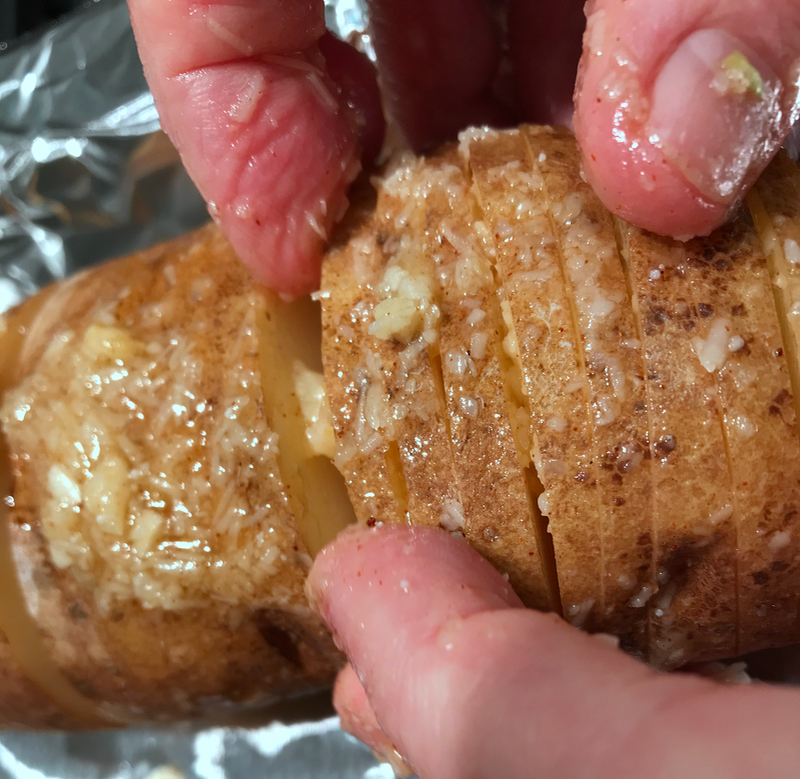
The name of this potato comes from the Stockholm restaurant where it was first served: Hasselbacken. I used a giant russet potato, but I think this might be better with a Yukon Gold or other medium-sized thin-skinned potato.
Tip for cutting: Lay two wood-handled spatulas/spoons on either side of the potato, and slice the potato crosswise at 1/8″ intervals, cutting to within 1/4″ of the bottom.
Ingredients: 4 medium potatoes, scrubbed; leave skin on 4 cloves of garlic, minced 3 Tablespoons olive oil kosher salt 1/8 to 1/4 teaspoon smoked paprika 2 Tablespoon grated Parmesan cheese
Preheat oven to 425 degrees F. Scrub potatoes, then cut as shown above in the photo, making sure not to cut through the bottom of the potato, as it will fan out a bit as it bakes.
Combine olive oil, garlic, 1/2 teaspoon kosher salt, smoked paprika and parmesan cheese in a small bowl. Mix well. Lay the potatoes on a baking sheet (can line with foil, if desired). Spoon some of the mixture over the top of the potato, then carefully insert pinches of the mixture in between the slits of the potatoes. Rub the outside with any leftover mixture, or if needed, a bit more olive oil.
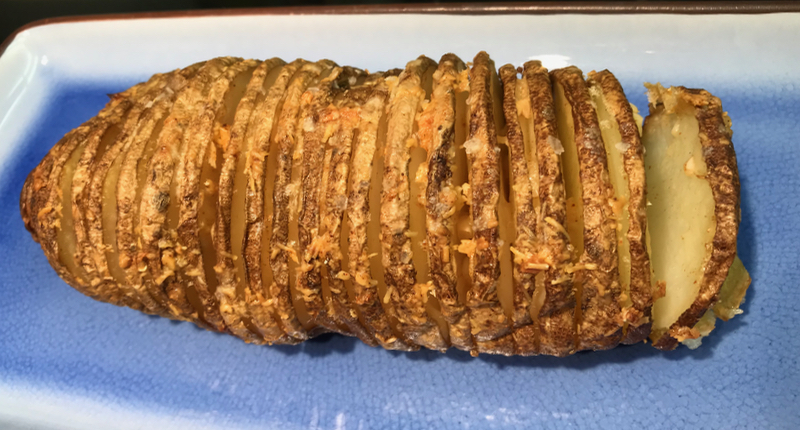
Bake for 40-45 minutes, or until the inside is cooked through and the outside of the potato is a bit crispy. If olive oil pools in the pan, it’s possible to baste the potatoes with this one time, to assist in crisping. Garnish with additional parmesan and chopped chives.
Note: the giant russets took forever to cook, nearly 90 minutes, and the flavor is earthy (not buttery like the Yukons), so I won’t use them again.
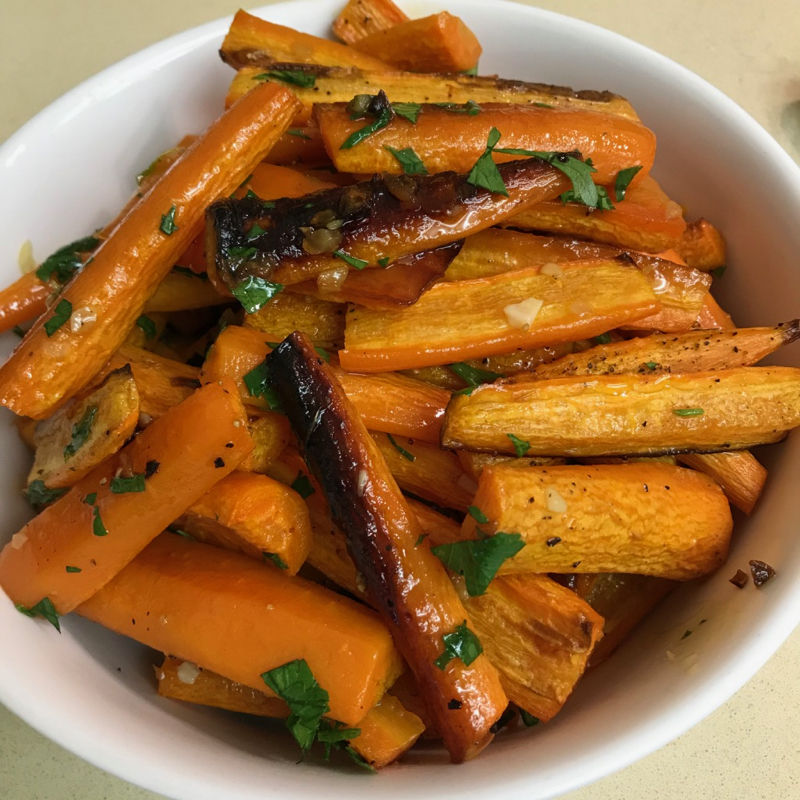
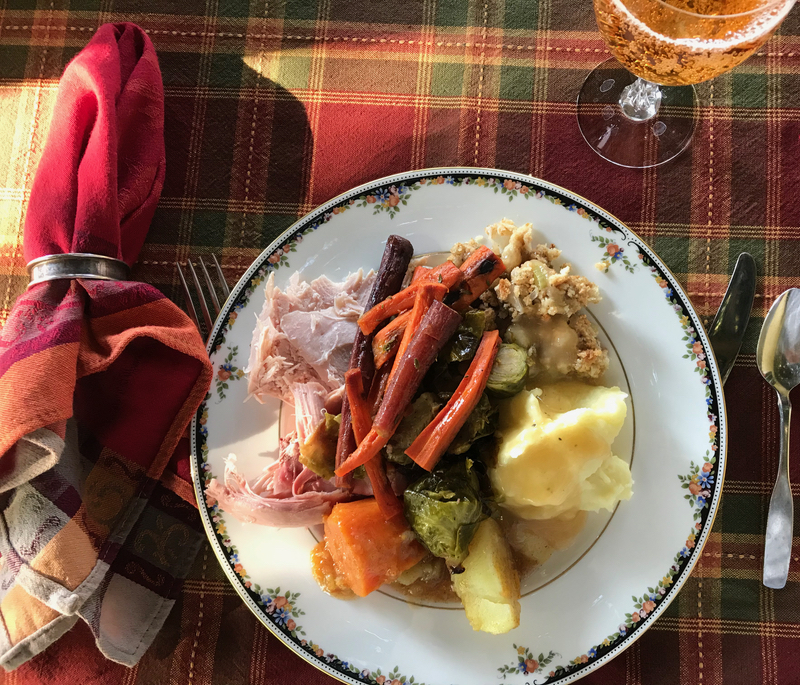
Ingredients 2 pounds carrots washed and peeled 1/3 cup butter 2 Tablespoons olive oil 3 tablespoons honey 3 garlic cloves minced Salt Freshly-cracked black pepper 2 tablespoons fresh chopped parsley
Instructions Preheat oven to 425°F (220°C). Lightly grease a large baking sheet with nonstick cooking oil spray; set aside. (If you choose to line the pan with foil, it may stick, so be generous with your cooking spray.)
Trim ends of carrots and cut into thirds. If the end of the carrot is thick, cut in half lengthwise, so that all carrots are about the same size. Place into large bowl.
Melt butter in a pan or skillet over medium-heat. Pour in honey, oil, garlic and cook while stirring, until garlic is fragrant.
Pour over the carrots, tossing so the carrots are well coated. Transfer carrots to baking sheet, and arrange into a single layer so they cook evenly. Season with salt and pepper. Roast for 20 minutes, or until carrots are fork-tender. Sprinkle with fresh parsley before serving.
Optional: Broil for 2-3 minutes on high heat to crisp/char the edges. (I did not do this.)
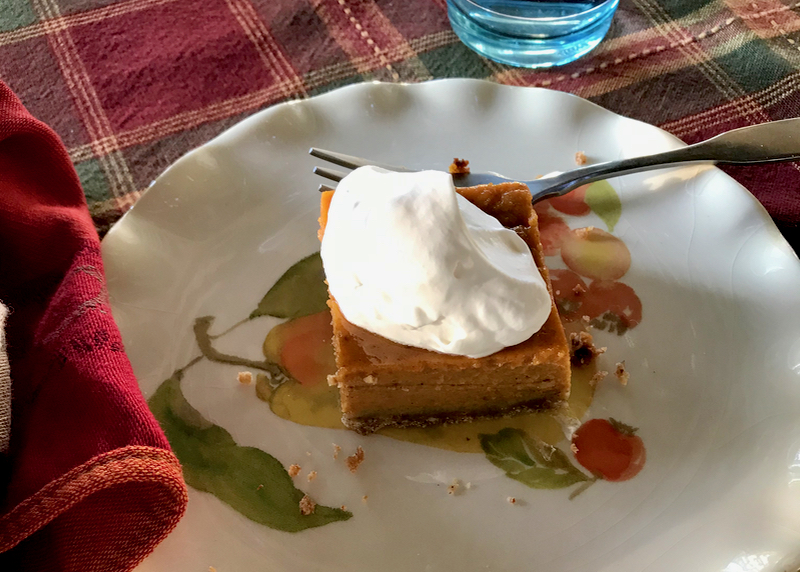
I served this to my pumpkin-pie-loving son Peter, a bit nervous to see if this new version — with a shortbread crust — would pass muster. It did, and it will be a long time before I go back to the other pie crust.
Prepare Pan: Lightly butter/grease the bottom of a 9″ square metal cake pan. Using a longer length of parchment paper, line the pan so there is an overhang of paper on two sides of the pan (to facilitate the easy release and removal of the bars after baking).
Preheat oven to 400 degrees F.
Crust: Into the bowl of a food processor, place 2/3 cup whole pecans. Pulse a couple of times to break them up.
Add: ⅓ cup light brown sugar 1 cup all-purpose flour Pinch of salt Pulse a few times to further chop the pecans and to blend.
Cut 6 Tablespoons of stick butter into smaller pieces, distribute around the flour mixture in food processor bowl. Pulse until butter is smaller than pea size. It will be loose in texture. Dump into the prepared pan, and with the back of a spatula, press into pan evenly. Bake for about 12-15 minutes, but do not let it burn. Remove from oven.
Turn oven down to 350 degrees F.
Filling (can be made while crust is cooking): Mix together dry ingredients in a small bowl: 3/4 cup granulated sugar 1 teaspoon ground cinnamon 1/2 teaspoon ground ginger 1/4 teaspoon ground cloves dash of nutmeg ½ teaspoon salt
Into separate, large mixing bowl, blend: 15 oz. can pumpkin puree 2 large eggs, yokes broken
Add in dry ingredients (sugar and spices). When blended, add in one 12-ounce can light evaporated milk (see notes below). Carefully pour over prepared crust.
Place in 350 degree F oven, and bake for about 55 – 60 minutes, or until knife inserted about 1-1/2″ from the center comes out clean.
Let cool on rack to room temperature, then place in refrigerator to chill for at least 2 hours. When ready to serve, gently loosen edge of crust from pan, then lift out and place on cutting board. Cut into 16 pieces.
Serve with a dollop of whipped cream, to which 1/2 teaspoon vanilla and 1/4 cup of powdered sugar has been added before beating it into soft peaks.
Note: Instead of light evaporated milk, regular evaporated milk may be used. The original recipe called for 1 cup half-and-half along with 1 Tablespoon cornstarch, a shake of pepper and 1 teaspoon vanilla. I just went with the regular Libby’s pumpkin pie recipe, and it worked just fine.
This is originally a recipe from Ina Garten, but as I didn’t have any “syrupy balsamic vinegar” that she calls for in the recipe, I made some modifications.
Ingredients 1 ½ pounds rainbow carrots, scrubbed (about 8 large or 15 medium carrots) 3 tablespoons good-quality olive oil 1 ½ teaspoons fresh thyme leaves Kosher salt and freshly ground black pepper ½ orange, zested and juiced 1 tablespoon high quality balsamic vinegar (if you have the aged syrupy kind, all the better) Fleur de sel or sea salt
Preparation Position an oven rack 4 inches away from the broiler and heat the broiler. Cut the carrots crosswise into 4-inch lengths. Cut the larger pieces lengthwise in half or quarters so the sticks are roughly 1/2-inch wide. Place in a bowl, and toss with the olive oil, thyme leaves, 1-1/2 teaspoons kosher salt. Place the carrots on a sheet pan and grind 1/2 teaspoon pepper over everything. Spread the carrots out in an even layer. Broil the carrots for about 10 minutes, tossing every few minutes, until they are tender and randomly charred. Top the carrots with the orange zest, orange juice and vinegar, return to broiler so juice/vinegar mixture thickens up a bit and coats the carrots. Sprinkle with some fleur de sel, if you have it, or kosher salt/grind some salt, if you don’t.
Taste for seasonings, then serve warm or at room temperature.
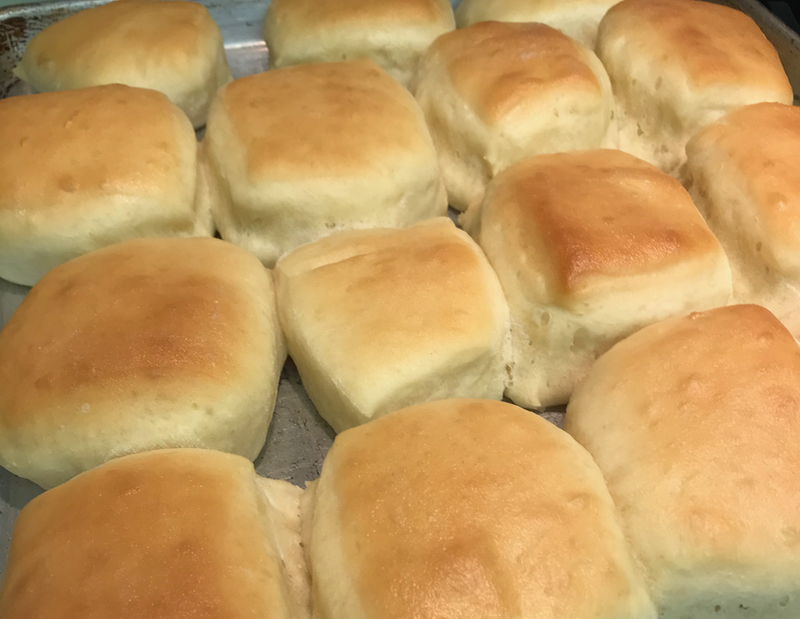
Ingredients 4 tsp active dry yeast 1/2 cup warm water 1 tsp sugar (to activate the yeast) 2 cups milk scalded and cooled to lukewarm 3 tbsp butter unsalted, melted and slightly cooled 1/2 cup sugar 7 – 8 cups all-purpose flour (start with less, then add as you go) 2 eggs 2 tsp salt 2 tbsp butter unsalted, for brushing over the finished rolls
Instructions Add the yeast, warm water and sugar to the bowl of your mixer and lightly whisk. Let it sit for about 10 to 15 minutes until the yeast dissolves and starts to foam. To the bowl of the mixer add the milk, butter, sugar, eggs and salt. Lightly mix everything together, using the dough hook of your mixer, for about one minute. Add the flour, 2 or 3 cups at a time, and mix. Add additional flour as needed and mix until the dough comes clean from the sides of the bowl and forms a soft dough. (The total flour could be anywhere from 6 to 8 cups, depending on your environment.) Don’t overmix as roll dough should be softer than bread dough. Place the dough in an oiled bowl and cover with a clean kitchen towel. Let rise in a warm place until double in bulk. Brush two baking sheets with melted butter. Punch down the dough and turn it onto a floured surface. Divide into two portions for shaping. Roll out the dough so that it’s about 1/2-inch in thickness. Cut into squares or rectangles; some of the edges will be triangular. Re-roll those, or just enjoy the shape. Repeat with remaining dough. Yield is roughly 30 to 35 rolls. Place onto the prepared baking sheets. Let the rolls rise until doubled in size.
Preheat your oven to 350 F degrees. Bake the rolls for about 15 to 20 minutes or until golden brown. Brush immediately with melted butter.
If desired, serve with Cinnamon Honey Butter. Prepare while rolls are baking, by whisking all the ingredients together: 1 stick butter unsalted, softened 1/4 cup powdered sugar 1/4 cup honey 1 tsp cinnamon
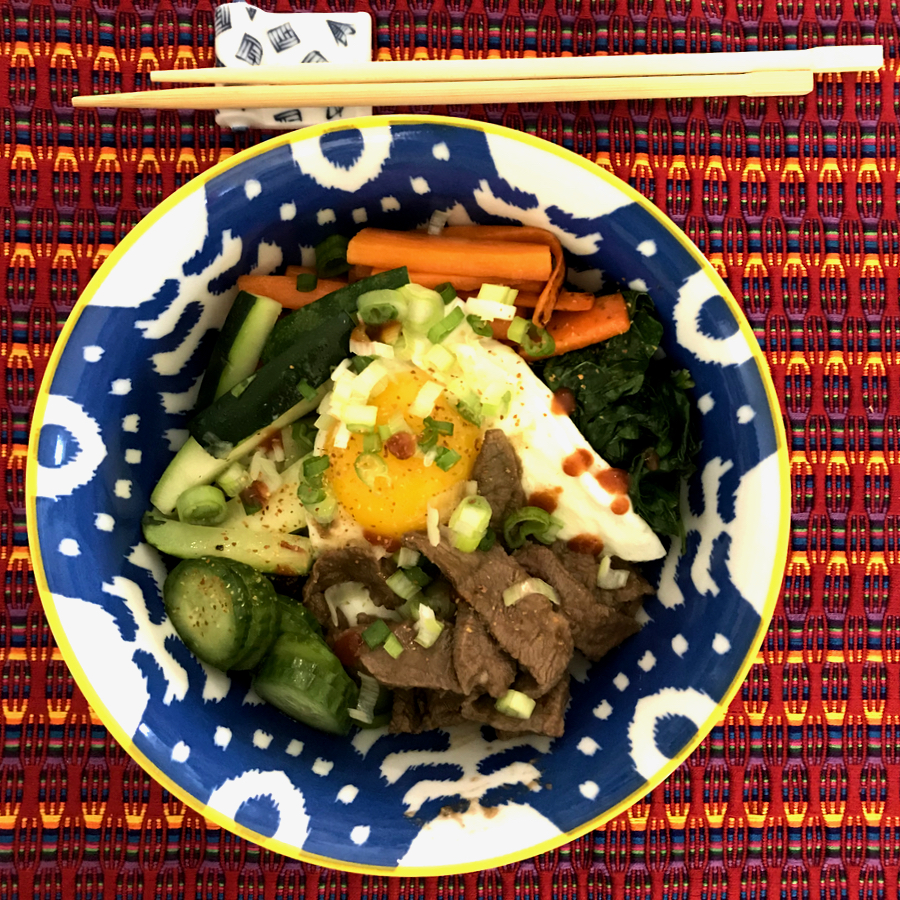
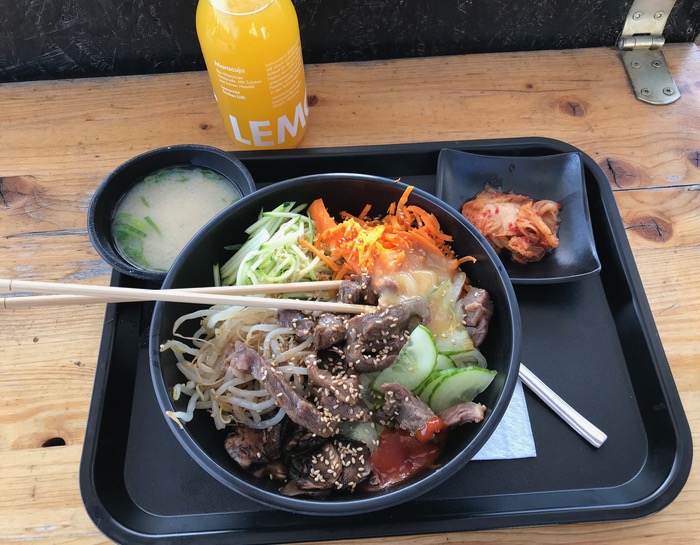
I had a hankering for some of the bimimbap I had while I was in Berlin. I walked up to the free-standing kiosk, in the middle of an empty lot. I had just been to do our laundry, so I was dragging my suitcase of clean clothes, which I parked by a chair, and went to order. It was some of the best I’ve had, matched only by the bowl in Incheon, South Korea.
Berlin Bibimbap stand
So I found this recipe and went to making. I first froze the steak so it was quite firm (but not solid) so it was easy to slice it thinly. I then made up the marinade, happy to see that it needed pear, which is just what the man at the Berlin booth said he included in his recipe. (He also grated it into the gochujang sauce, too, which made it a touch sweet and a bit milder than usual).
Bulgogi 1/2 cup reduced-sodium soy sauce 1/3 cup finely grated Asian pear with juices 2 scallions, thinly sliced 2 garlic cloves, minced 1 tablespoon raw or brown sugar 2 teaspoons grated peeled ginger 1 pound thinly sliced (1/8-inch) boneless beef rib-eye steak or short ribs Whisk first 6 ingredients in a medium bowl. Add beef; toss to coat. Cover; chill for 30 minutes or up to 3 hours.
Rice, freshly cooked short grain brown rice, or crisp rice (recipe below) • 3 tablespoons toasted sesame oil, divided • 8 cups steamed sushi rice or mixed grain rice (from 2 1/2 cups dry rice) Bibimbap Mix-Ins: • bean sprouts • julienned carrots (can use *this* tool, or just cut in matchstick pieces) cooked spinach (can sautée the cooked spinach with garlic, if desired) • sauteéd zucchini • green onions–ribboned or thinly cross-cut (can be tossed with sesame oil, rice vinegar, salt, pepper) • sliced cucumbers, (tossed with sesame oil, rice vinegar, salt, pepper) gochujang sauce • 8 fried eggs (while fried is traditional, I usually use a poached egg)
While the original recipe called for crisp rice, I didn’t do this–we just served it over warm brown rice from the rice cooker. I’m including it here in case it’s something you want to do. In addition, I halved the sliced steak and the marinade, freezing one-half. I also cut down on the additions.
Bibimbap in Berlin
Optional: To Crisp the Rice: Heat 1 tablespoon oil in a large cast-iron or nonstick skillet over medium heat. Add rice; pat out in an even layer. Cook, rotating skillet for even browning (do not stir), until rice is golden and crisp on bottom, about 15 minutes. Meanwhile, heat 1/2 tablespoon oil in a large heavy skillet over medium heat. Add one-quarter of beef and cook, turning once, until cooked through and lightly browned, about 3 minutes. Transfer to a bowl. Repeat in 3 batches with remaining oil and beef. Divide rice among bowls. Top with beef, bibimbap mix-ins, and eggs. Serve kimchi alongside.